Be sure to check out the sequel to this post Building an Even Better Task Sequence.
I’ve had this post in the queue for a while now and have been working on a script to help with some of this, but with the release of System Center Configuration Manager 1810 I don’t have to hack something together anymore! One of the best new features which allows us to capture the name of the last action using the new variable _SMSTSLastActionName. I’m so excited about this new variable! Let’s get to it.
Failure is Inevitable
No matter how well you build your ConfigMgr Task Sequences, you will encounter failures. When you are testing in your lab, no big deal, but what about failures at a user’s desk during an In-Place Upgrade? Adding structure to your Task Sequences that can properly handle the failures will add an extra layer of protection against incomplete deployments going unnoticed.
Try - Catch - Finally
If you’ve ever done any programming, you will likely be familiar with concept of Try-Catch-Finally. The general idea is that Try is your block of code. As it executes, if an error occurs, you can allow the code to continue to execute (non-fatal error) or you can Catch the error (fatal-error). In the Catch block, you can execute additional code to process the error. Then, regardless of what else happens, the Finally block will run to process any additional code that you ALWAYS want to run, no matter the outcome of the previous code. If you structure your Task Sequence using similar logic, you can improve the chances of capturing and remediating failures and reduce the number of failed deployments that make it out into production.
Basic Framework
Inside your Task Sequence, always create a top level group. I like doing this so it’s easier to copy and paste the entire task sequence. Inside this group, create 4 groups at the same level. Main, Failure, Success, Cleanup.
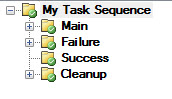
On the Main, Failure and Success groups, check the Continue on error box.

Main
All of your task sequence logic will go into the Main section. If you already have an existing task sequence, you can just add a Run Task Sequence step and reference it! The biggest thing to keep in mind is that you should never enable Continue on error for any step that is critical or required for a deployment to be considered a success. In fact, if you have a step that occasionally fails, try to add logic to detect whether you need to run the step, before attempting it, just to eliminate any unnecessary errors from always showing up in the logs. Additionally, failures fail up the the parent group, so you could have steps fail inside a group, but have the group continue using Continue on error. As the last step in Main, add:
Type: Set Task Sequence Variable
Name: Set AllStepsSucceeded = True
Task Sequence Variable: AllStepsSucceeded
Value: True
By setting this variable, we will know whether we made it to the end without any fatal errors.
Failure
Next, select the Failure group and select Options and add the following Condition: Task Sequence Variable _SMSTSLastActionSucceeded equals False
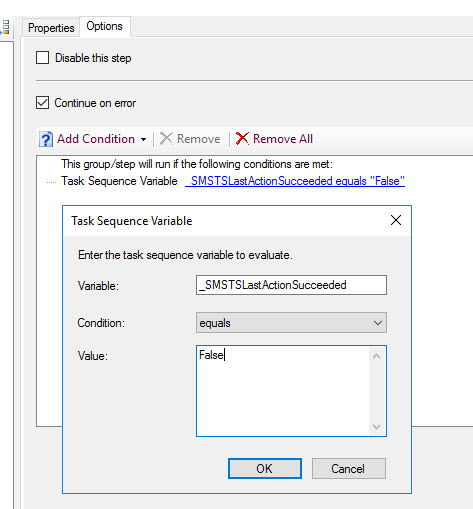
This will ensure that the Failure group only gets processed if the previous action failed.
Add a Set Dynamic Variables step and set the following:
Variable: FailedStepName
Value: %_SMSTSLastActionName%
Variable: FailedStepReturnCode
Value: %_SMSTSLastActionRetCode%
Variable: AllStepsSucceeded
Value: False
Variable: SMSTSErrorDialogTimeout
Value: 86400
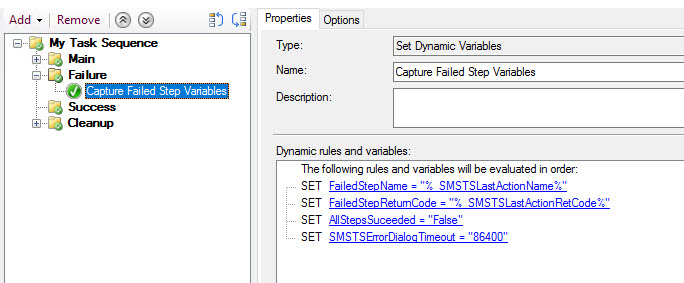
It’s important that this is the first step that you run after a failed step or else you will lose the values. Now that you’ve captured them, you can process any additional steps that you need to inside the Failure group.
Success
Next, select the Success group and select Options and add the following Condition: Task Sequence Variable AllStepsSucceeded equals True. This will ensure that Success will only run if the task sequence made it to the end without failure. You can add any steps inside here that you would only want to run if the Task Sequence was successful.
Cleanup
Finally, on the Cleanup group, add steps like Copy Logs or Remove from Provisioning Mode or any other steps that will help make it easier to triage failed deployments. No matter what you add here, be sure that the final step is this one:
Properties
Type: Run Command Line
Name: %FailedStepName%
Command line: cmd.exe /c exit %FailedStepReturnCode%
Options
Task Sequence Variable: AllStepsSucceeded equals False
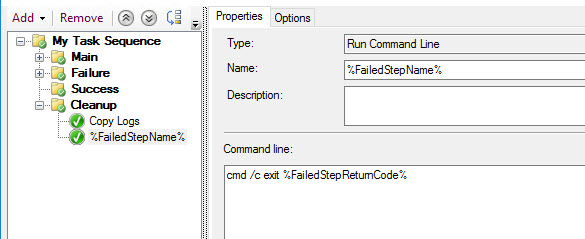
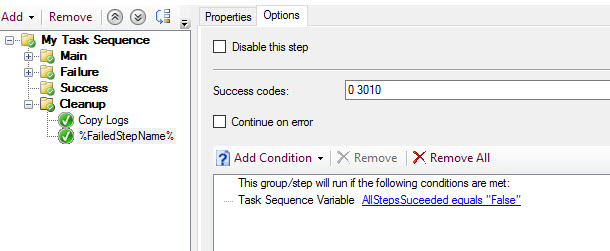
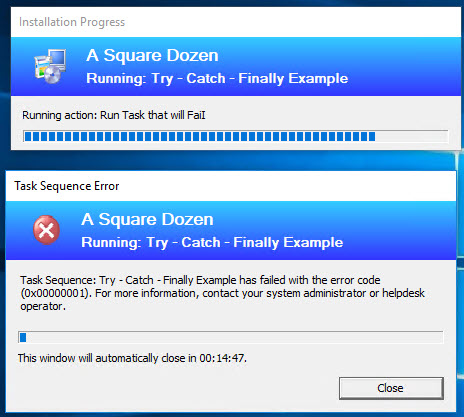
This last step is the one made possible with ConfigMgr 1810. Now, when my Task Sequence fails and the error dialog is still on the screen, it will display the name of the last step that ran before the error occurred using the _SMSTSLastActionName build-in variable.
The result that a user will see (and likely send you a screenshot of) will show the name of the step that caused the failure now, even though you have already processed all of your cleanup steps, like copying logs. At least at my site, this is a HUGE feature that will make triage much simpler.
Summary
If you build a better task sequence, you will build a better deployment experience for your users and your first line workers who have to troubleshoot issues. Next steps to consider would be adding things like splash screens or login blocking policies (lots of great community blogs about these concepts). You could even get fancy and hide the progress dialog box and show a custom one, including the error dialog. There are so many great ways to customize your Task Sequences, I am just really excited about the _SMSTSLastActionName variable!
Download!
I know it’s not much, but you can download the sample Task Sequence here.