This is the first post of my Windows 10 Feature Updates series, probably totally out of sequence, but I just need to start getting the pieces written and published. So here goes.
What is SetupDiag
If you have worked with Windows 10 Operating System Deployments for any amount of time, you’ve likely had failures and encountered cryptic messages that you needed to triage. Hopefully you’ve come across SetupDiag. For the uninitiated, SetupDiag is a fancy little tool from Microsoft that you can run against the Windows installation logs (Panther Logs) either directly on a client or against an offline copy of the Panther logs from another client. After a few minutes, you should get a nicely formatted report to help you quickly find the offending error. As a matter of fact, as I started writing this post, I checked the site and and found a new version was available that fixes several issues that I reported last week and added several cool new features (Thanks Sudhagar for passing on my issues!). Bookmark THIS page and visit often. Not only does it have a link to download the latest version of SetupDiag (version 1.6.0.0 as of 8/19/2019) but there are other pages with troubleshooting info.
Some people only run SetupDiag after a failure, but with some of the cool features of the script, I find that it provides useful information even for successful feature updates.
SetupDiag and Feature Updates
In my other posts in this series, I’m going to show how you can integrate SetupDiag into your Task Sequence or WaaS Feature Update deployments for Windows 10. To start, I’ve written a PowerShell wrapper to launch SetupDiag and parse the output that can be consumed by SCCM inventory or used for copying logs to network shares for easy processing. Note: You don’t NEED my script, you can just manually run SetupDiag as needed.
The script Process-SetupDiag.ps1 is designed to be run standalone or references inside another script, like a script to copy logs to the network after a successful or failed upgrade. Note: The script was written on version SetupDiag 1.5.0.0 and already in version 1.6.0.0, some things may not be as necessary as before. Regardless, the (current) key features include:
- Parsing of the XML output to create a summary log for quick reference by your imaging techs.
- Return value of Success/Failed/NoMatch/Unknown for easy consumption by other scripts or Configuration Items. I use this return value to add the status to a log folder on a network share for each device. It makes it easy to find failed machines.
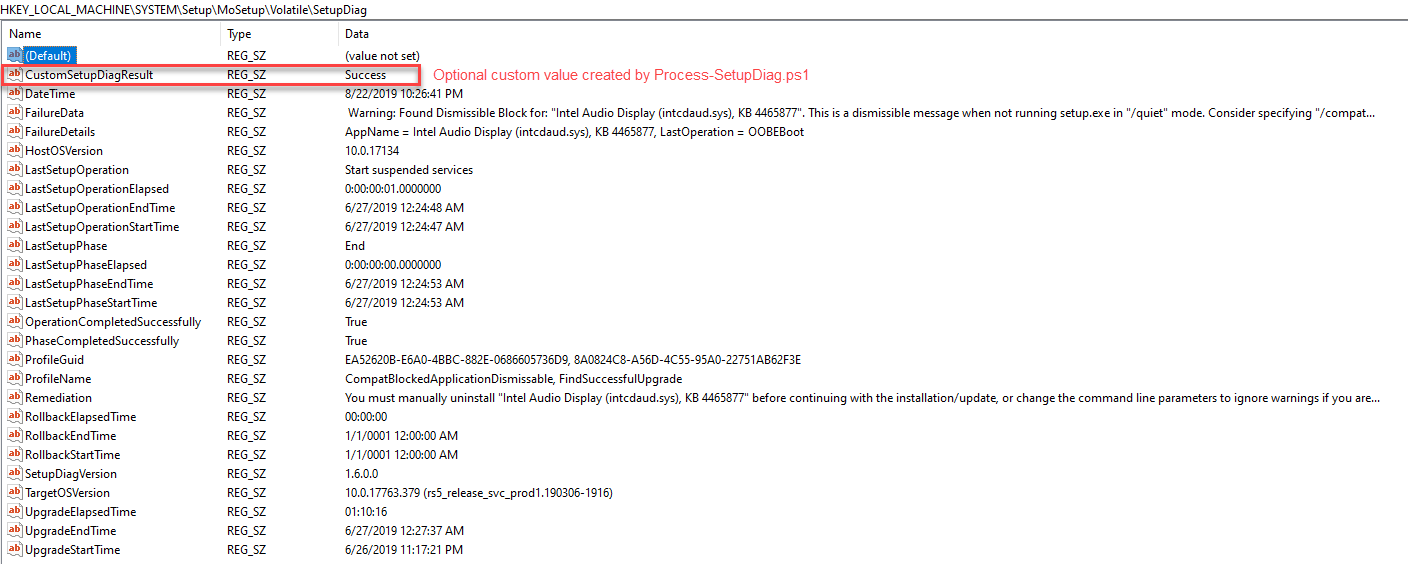
- Custom Registry Key (
CustomSetupDiagResult) option using the return value. This key gets written to the same location as SetupDiag writes so you can inventory everything at once.
Process-SetupDiag.ps1 requires access to SetupDiag.exe. I copy these files to a local temp directory c:\~FeatureUpdateTemp\Scripts so that I can easily execute them through various options. I’m
Registry Entries
In version 1.5.0.0 an option was added to write a registry key with values that get written to the output log file. In version 1.6.0.0, several new values were added. Here’s an example from 1.6.0.0 of the current registry keys:
This is the same machine’s XML output.

Reading SetupDiag Results
SetupDiag output is pretty straightforward. Some key fields that I generally use are ProfileName, FailureData, FailureDetails, Remediation. Prior to 1.6.0.0, if you deployed the Feature Update with the /Compat IgnoreDismissable command line option, the OS would skip over dismissable compat blocks but setupdiag would report the ProfileName as CompatBlockedApplicationDismissable instead of FindSuccessfulUpgrade but the FailureData section would contain the text SetupDiag reports successful upgrade found. as seen above. Now in 1.6.0.0, the ProfileName includes each profile that was matched by SetupDiag.
FailureData, FailureDetails & Remediation now provide lots of useful information and URLs to help you shortcut your remediation efforts. Your deployment techs should be able to use this information as their first stop for troubleshooting.
The ProfileName will display one or more of the currently 60 rule matches. You can look up the rule matches here if you want more information. Ultimately, use the info that you get from SetupDiag to reference the docs site for more information.
Inventorying SetupDiag Results
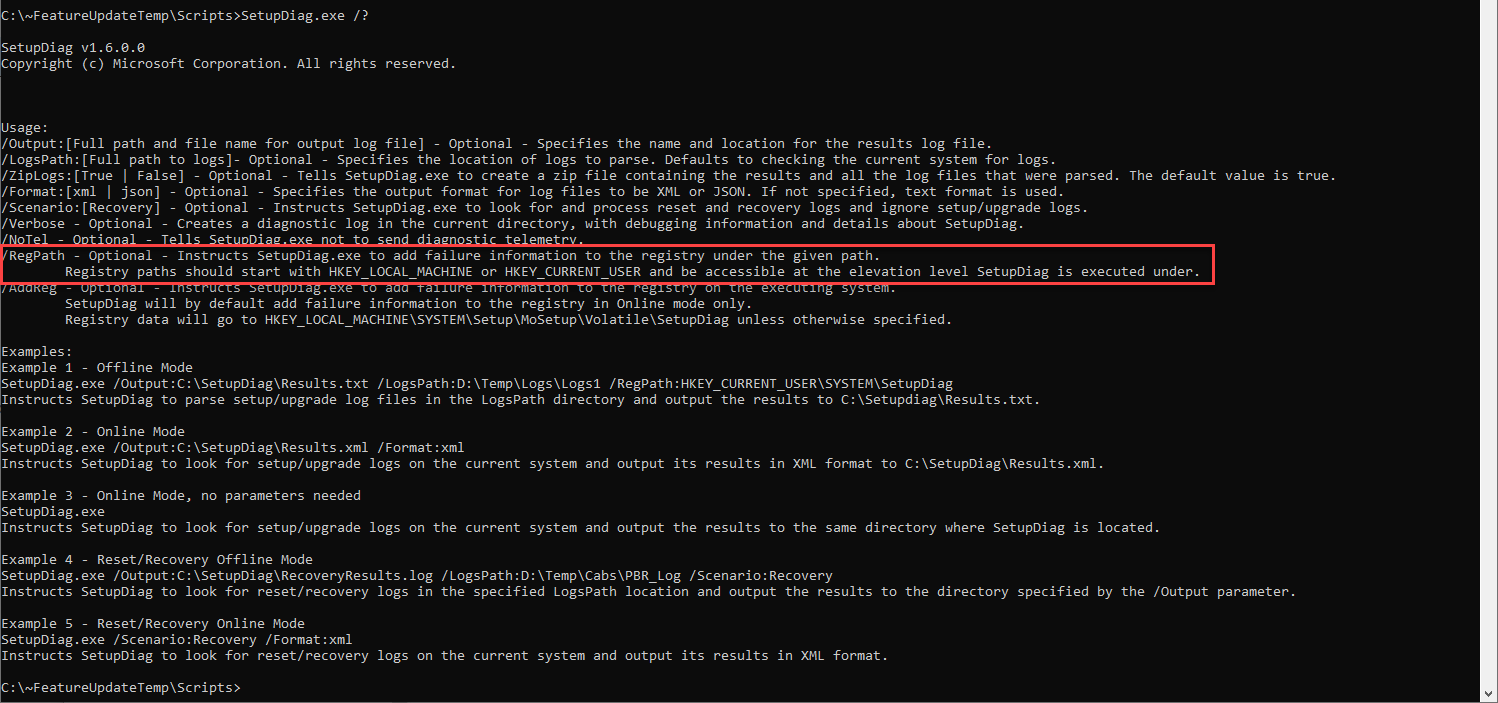
First - as of 1.6.0.0 you can use the /RegPath command line option to output the SetupDiag registry key to a custom location. You can find usage information by using SetupDiag.exe /?. At the time of this post, the docs don’t have updated information and I’m told that they will be rebuilding the page soon, so I’m not sure if they will update it or not.
Ok, so I’ll admit that I MAY have gotten a bit carried away with my script writing. I wanted to write a reusable script to build a custom WMI class that can be inventoried by SCCM. I have used RegKey2MOF numerous times and it works great, but I didn’t want to have to edit my configuration.mof AND I wanted to be able to merge multiple registry keys together. So if you’re more comfortable with using RegKey2MOF, check out Garth Jones’ great blog post on using it and point it to the SetupDiag registry key. Just note that you will end up with 2 tables if you collect from the 2 registry keys I’m using. The latest version is on the Technet Gallery here.
If you are still with me, then you will need my script called New-WMIRegistryClass-SetupDiag.ps1. It is built so that you can quickly swap out the keys you want to collect and use it for other WMI/Registry collection.
When you run the script, it will create a new WMI Class called CM_SetupDiag after deleting the class if it already exists. The downside with using a script to inventory this data is that you have to re-run the script all of the time to keep the WMI class updated. Fortunately we can just create a new Configuration Item/Baseline that runs the script on a regular basis, then the scheduled Hardware Inventory cycle will pick it up.
Putting it All Together
I’ve created a new GitHub Repo with all of the latest versions of these scripts. I’m not going to post the full code snippets so that if I update the scripts, I only have to do it on one place. Also, note that the repo contains several extra scripts that I will be going over in future posts coming soon.
- Visit the repo here: https://github.com/AdamGrossTX/Windows10FeatureUpdates and download the following:
Scripts\Process-SetupDiag.ps1Admin\ComplianceScripts\New-WMIRegistryClass-SetupDiag.ps1
- Copy
Process-SetupDiag.ps1toC:\~FeatureUpdateTemp\Scriptson your clients. If you need a script to do the copy, in the Repo you will seeCopy-FeatureUpdateFiles.ps1. I will cover this script in more details later. I use it in an Application and use the folder and setupdiag version as detection methods. More on this later. - Download the latest
SetupDiag.exefrom https://docs.microsoft.com/windows/deployment/upgrade/setupdiag and copy toC:\~FeatureUpdateTemp\Scripts - Create a new Compliance Item in the SCCM Console
- Name: Feature Update - SetupDiag Inventory
- Supported Platforms: Window 10
- Settings:
- Name: SetupDiag WMI Create Class and Inventory
- Setting type: Script
- Data type: String
- Discovery script: import
New-WMIRegistryClass-SetupDiag.ps1
- Compliance Rules:
- Click New
- Name: Script Returns True
- Value returned by script: Equals True
- Create a new Configuration Baseline
- Name: SetupDiag Inventory
- Evaluation Conditions: Select the CI you created above.
- Test then deploy with a schedule that will run more often then your hardware inventory is scheduled to run.
- Once you have the class in WMI on your client, you can import it into SCCM Client Settings. If you want more details on this process, check out the docs here.
- Open Default Client Settings
- Select Hardware Inventory>Set Classes
- Click Add
- Click Connect
- Ensure WMI Namespace is set to
root\cimv2and click Connect. - Select CM_SetupDiag from the list
- Click Edit Don’t skip this part!!
- Change the Length for FailureData, FailureDetails, Remediation to 1500 (I hope this is long enough!)
- Changing the length will allow you to collect the full data from the the registry keys.
- Click Ok
- Click Ok
- Uncheck the newly added class and Click Ok
- Open your client settings policy that you deploy to your Windows 10 clients (surely you don’t use the Default Client Settings Policy!!)
- Browse back into Hardware Inventory and recheck the new class and click ok
- Once your clients begin running the baseline and hardware inventory, you should begin seeing data in the database as well as in the console where you can use it for reporting or collection creation.
Reporting on SetupDiag results
If you want to report on the data you are collecting, this query should give you all of the devices that have failed for some reason. It is also included in the repo under SQL\SetupDiagFailures.SQL.
| |
You can also make a query or collection in the SCCM console. Just look for the same table name and build it the same as above.
Summary
I hope you were able to follow along. I’ve got a lot more to share on the topic of Feature Updates so stay tuned. Please reach out to me if you find any issues with the instructions or the scripts. Feel free to edit and PR the scripts in the repo.