If you’ve been managing Windows 10 for very long, you’ve likely implemented a script or other method to remove some of the In-Box apps that come with Windows 10. We have been using a customized version of a script that Michael Niehaus published in 2015. It uses PowerShell and an XML file with a list of apps to be removed. I have integrated it into my Windows 10 offline servicing script that I use to apply updates to my image each month. We used to run this script as part of the Task Sequence but found that it started hanging so we moved it to the offline servicing process instead. However, we are continuing our process of streamlining our processes and reducing customizations for our Windows devices. We have decided to use the Windows Store to manage the removal of these apps instead of relying on a separate script. This will allow us to provide a consistent experience to our users whether their devices are built using traditional OSD or if we go more modern with AutoPilot/Intune. Using PowerShell could still work from ConfigMgr or Intune as well, but I think there are several benefits to this process over using a script.
- Visibility - apps can be seen in ConfigMgr or Intune allowing any admin to see what’s being removed.
- Manageability - no scripting is required. Just add the app to the store and deploy the uninstall to all users.
- Flexibility - the apps can be added back or additional apps can be removed easily. No editing scripts needed.
Note 1: I know there are numerous rebuttals in support of scripting. This is just an additional option to consider. Do what’s best for your organization. Note 2 : I would prefer to never remove any of these apps, however apps like Mail and Office simply create confusion for the users and it reduces support calls if we just remove them.
Making a list of Apps to Remove
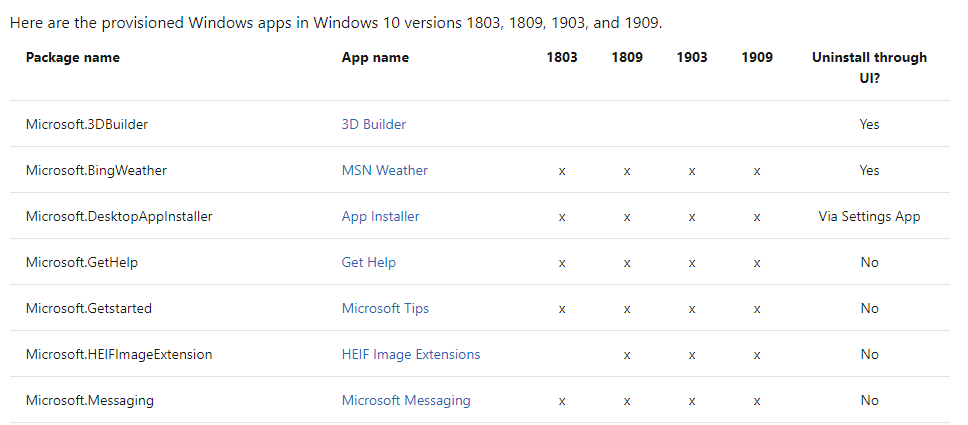
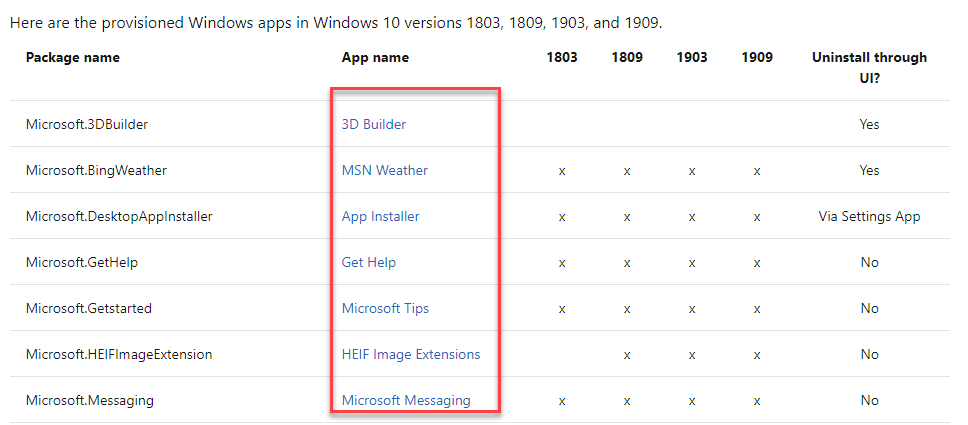
The first challenge is identifying the apps you want to remove. This Microsoft Docs page has some great info identifying which apps are already provisioned on a Windows 10 device and it also has a table to map the package name to the app name as it’s listed in the Windows Store. The table also indicates which OS each app is included in. As of today 8/6/2020 Windows 10 2004 isn’t included, however I filed an issue on the GitHub repo asking for it to be added. Additionally, some of the store app names have changed so I submitted a PR on the page with updates that you can reference if the page isn’t updated soon.
Here’s my list (from my servicing repo linked above).
- Microsoft.MicrosoftSolitaireCollection
- Microsoft.Messaging
- Microsoft.MicrosoftOfficeHub
- Microsoft.Office.OneNote
- Microsoft.OneConnect
- Microsoft.People
- Microsoft.SkypeApp
- Microsoft.Wallet
- microsoft.windowscommunicationsapps
- Microsoft.XboxApp
- Microsoft.XboxIdentityProvider
- Microsoft.Xbox.TCUI
- Microsoft.XboxGameOverlay
- Microsoft.XboxGamingOverlay
- Microsoft.XboxSpeechToTextOverlay
- Microsoft.ZuneMusic
- Microsoft.ZuneVideo
As you can see, this it the package name that you get from PowerShell. However if you attempt to search for these in the Microsoft Store for Business (MSfB) or even the regular Windows Store, many aren’t listed (Looking at you Zune Music!). After some discussion with my buddy Alpharius on the WinAdmins Discord today, we found a way to map these to the store pretty easily.
Spoiler: Some packages aren’t available for removal this way. Microsoft.Wallet (Microsoft Pay) and Microsoft.XboxGameOverlay (Xbox Game Bar Plugin) are 2 that I found weren’t available.
Mapping Provisioned Packages to Microsoft Store for Business Apps
If you took a look at the table on the docs page, you will have noticed that there’s a link included next to each package that opens the Windows Store to that app giving you the correct app name. You’ll need to do this from a device where the Windows Store has not been locked down or the Docs links won’t work properly.
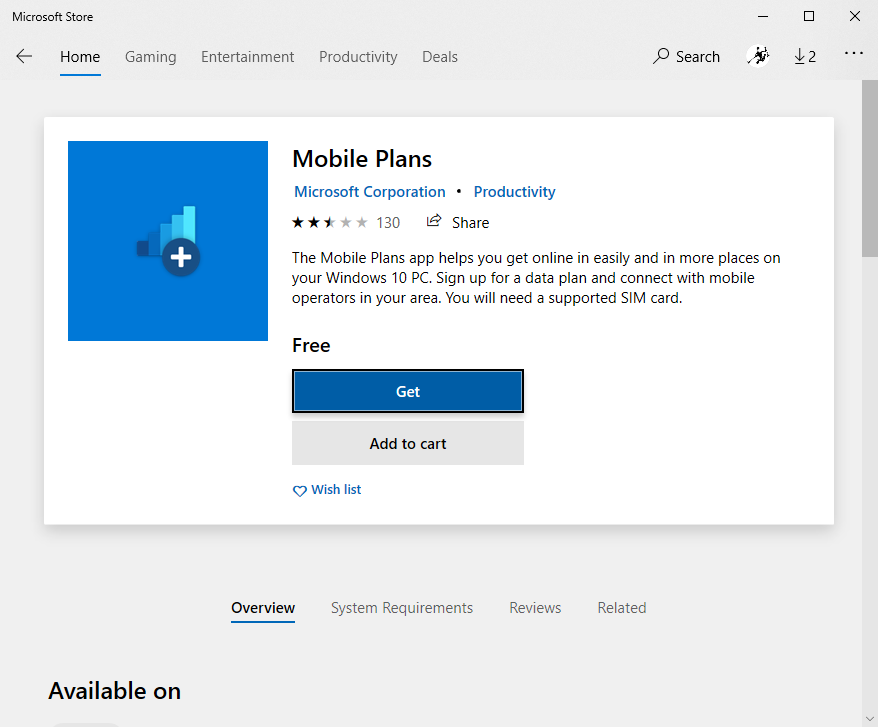
In this example, I’m going to use the Microsoft.OneConnect package. In the docs it’s listed as Paid Wi-Fi & Cellular (Cellular is a very funny looking word).

When you click the Paid Wi-Fi & Cellular link, it will prompt to open in the Windows Store which will open to Mobile Plans
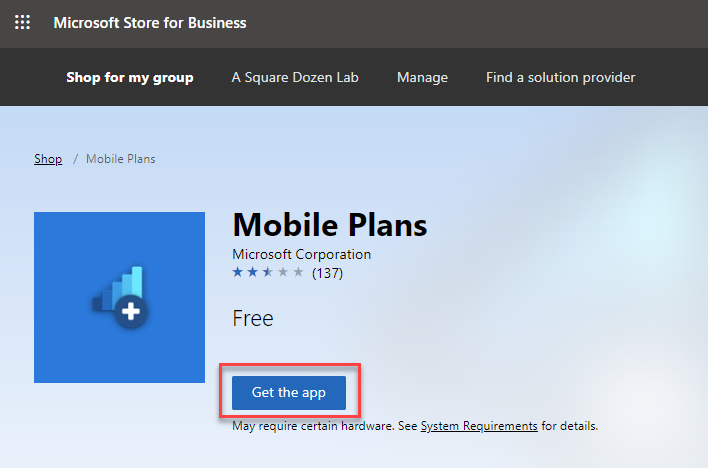
Next we just need to search for the app by the correct name Mobile Plans in the Microsoft Store for Business. Once you find Mobile Plans, click Get the app to add it to your store.
Adding Unlisted apps to your Private Store
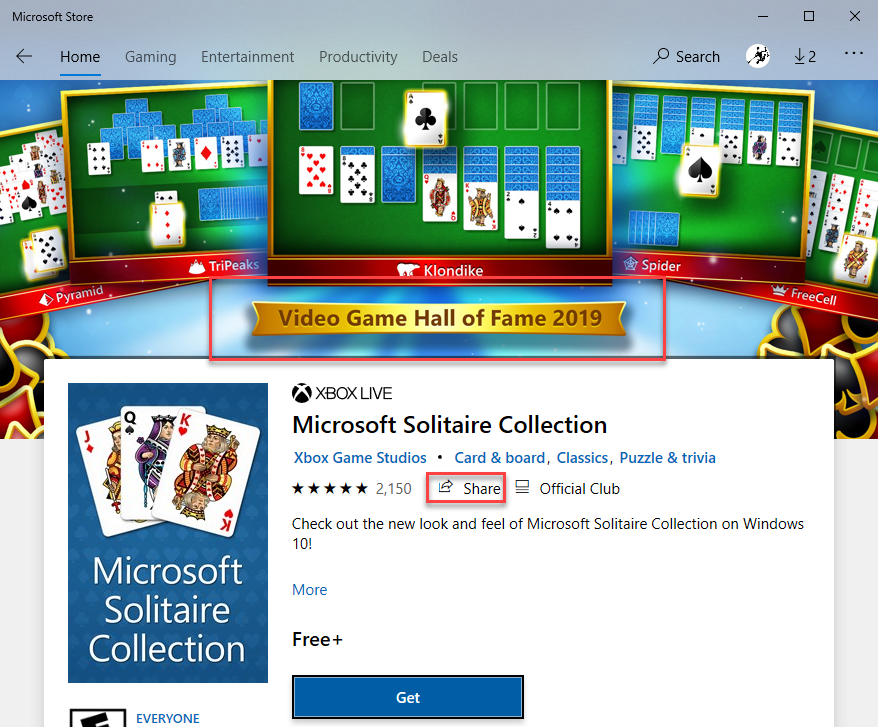
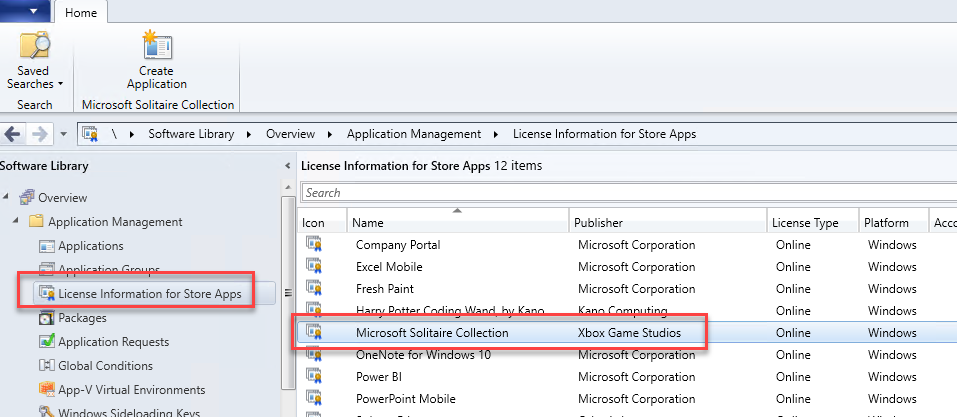
For many of the apps that you may want to remove, it’s that simple to find them. However, for some apps like If you go search for the app in the MSfB, many of them aren’t listed (no clue why). Here’s the workaround for that. The Microsoft.MicrosoftSolitaireCollection package is a great example. If you search for it in the WSfB, you won’t find it.
From the Docs page, click the link next to Microsoft.MicrosoftSolitaireCollection to open the Store app on your computer. Next click the Share icon next to the app name then click Copy Link from the screen that pops up.
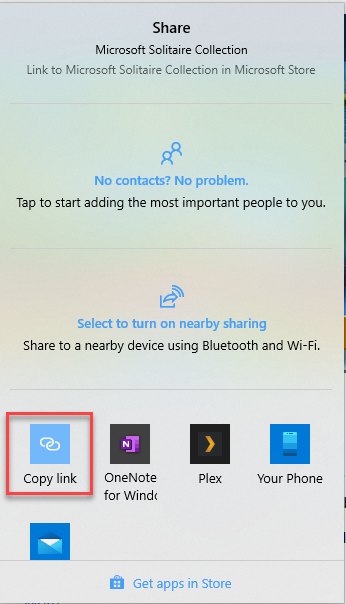
Your link will be something like this:
https://www.microsoft.com/store/productId/9WZDNCRFHWD2
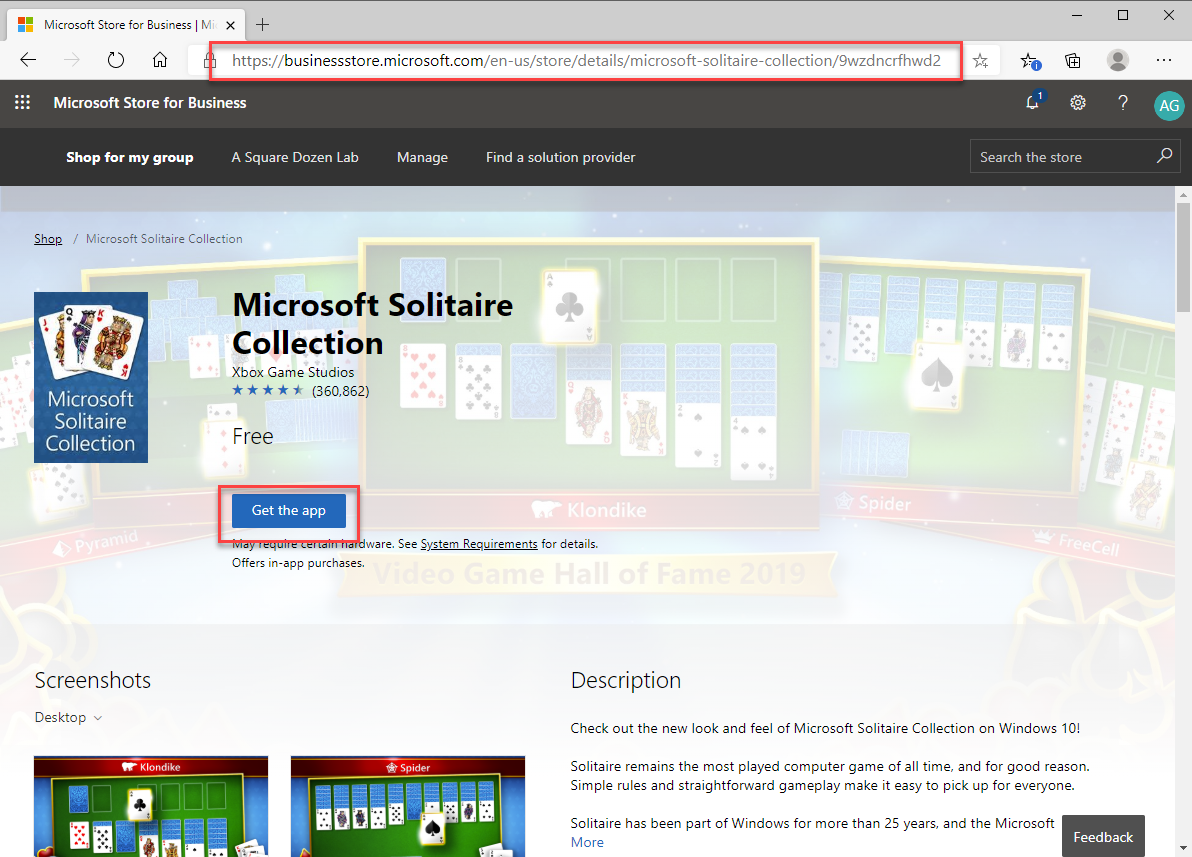
If you paste that link into your browser you’ll be taken to the same page as you saw in the store, but you’ll have a new URL. That’s what we’re after.
Note: You have to navigate to the page in the browser or it won’t re-write the URL we need for the next step.
After you navigate to the page, the new URL will be something like this:
https://www.microsoft.com/p/microsoft-solitaire-collection/9wzdncrfhwd2?activetab=pivot:overviewtab
Remove the beginning of the URL and the querystring to end up with this:
microsoft-solitaire-collection/9wzdncrfhwd2
Log into your Windows Store for Business.
Create a new URL with the text from the previous step and paste into your browser and click Get the app to add to your store.
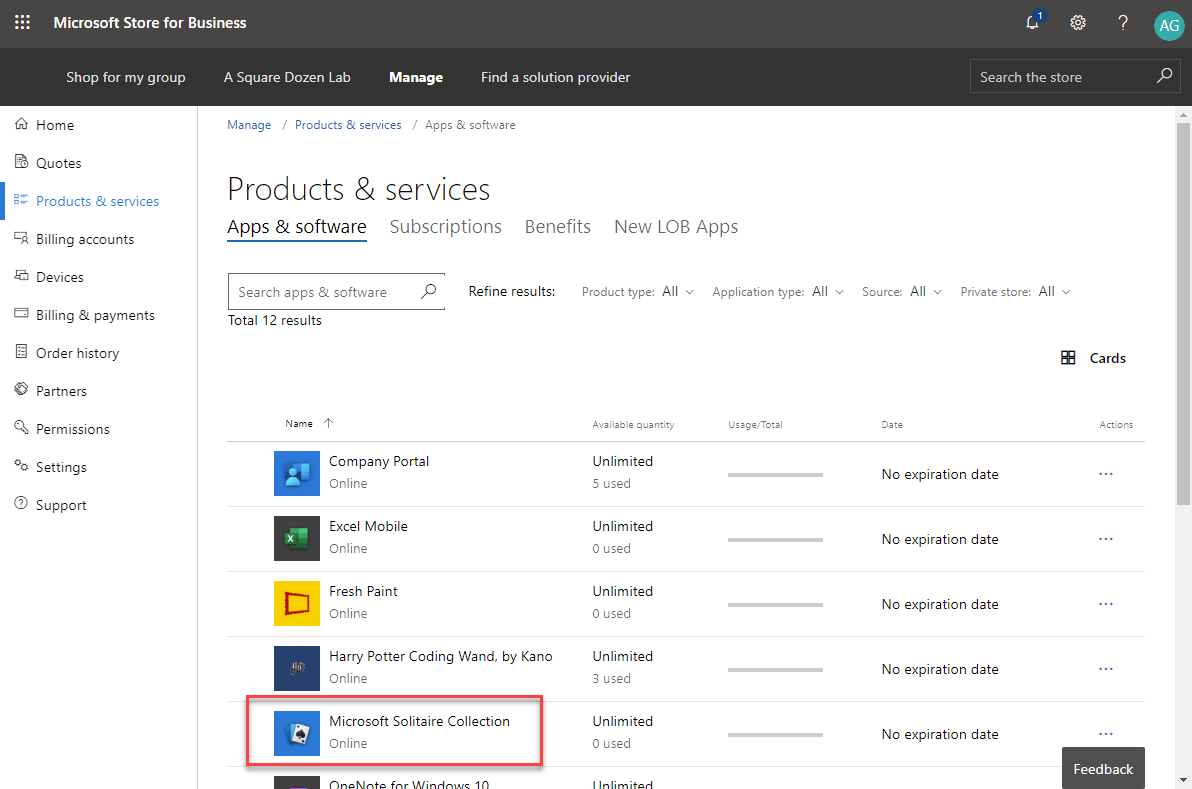
Verify that the app has been added by navigating to Products & Services. You don’t need to add these to your Private Store unless you want people to see them listed. Otherwise, simply having them in your account is all that’s needed.
Sync the Apps
Once you’ve added all of apps from your list, you’ll need to sync them to your deployment tool (or just wait a day) the Deploy. Follow steps for ConfigMgr and/or Intune. If you are using ConfigMgr Co-Management you can choose to use either option depending on where the Client Apps Workload is.
After you transition this workload, any available apps deployed from Intune are available in the Company Portal. Apps that you deploy from Configuration Manager are available in Software Center. https://docs.microsoft.com/mem/configmgr/comanage/workloads#client-apps
ConfigMgr
I have previously covered configuring ConfigMgr to deploy Windows Store apps. Please refer to that blog for full details. This setup is a prerequisite for using ConfigMgr to remove In-Box apps this way. If you’ve got it setup already, proceed.
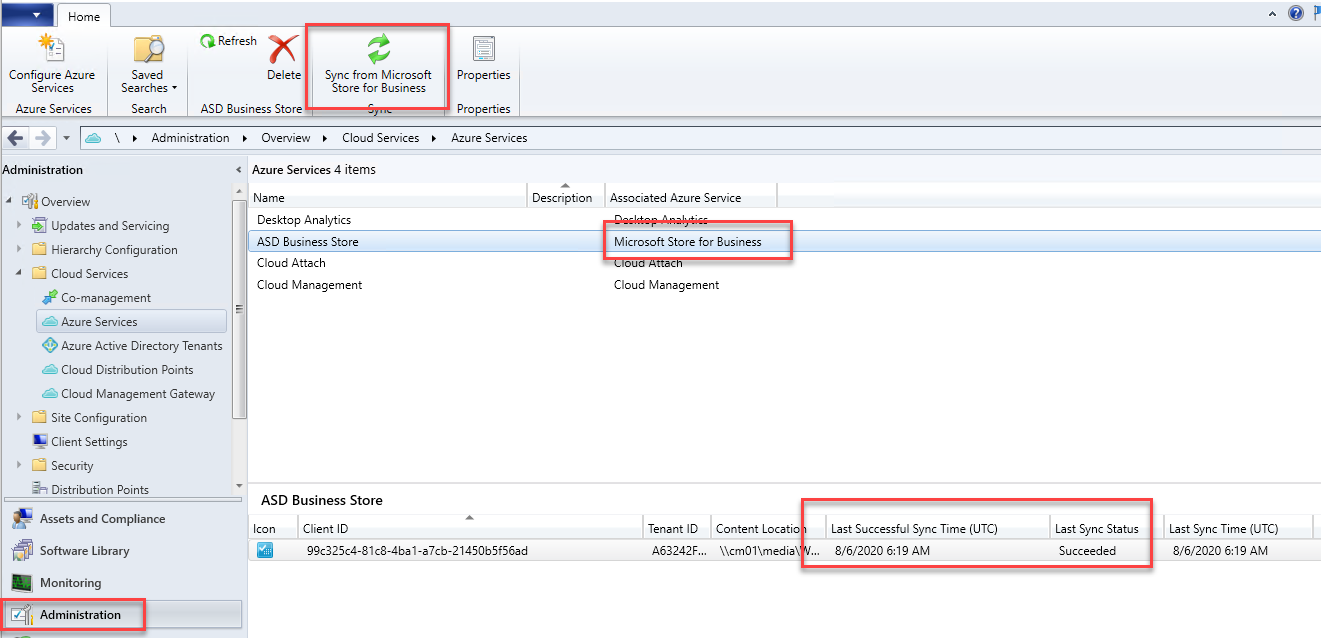
Open your ConfigMgr console and navigate to Administration\Overview\Cloud Services\Azure Services and select your Microsoft Sore for Business service. Then Click Sync From Microsoft Store for Business. Refresh the page until the status in the lower pane updates with the current time.
Note: You did you know you can paste Administration\Overview\Cloud Services\Azure Services into the breadcrumb/address bar in the console to navigate directly to this node?
Once the sync is complete, navigate to \Software Library\Overview\Application Management\License Information for Store Apps
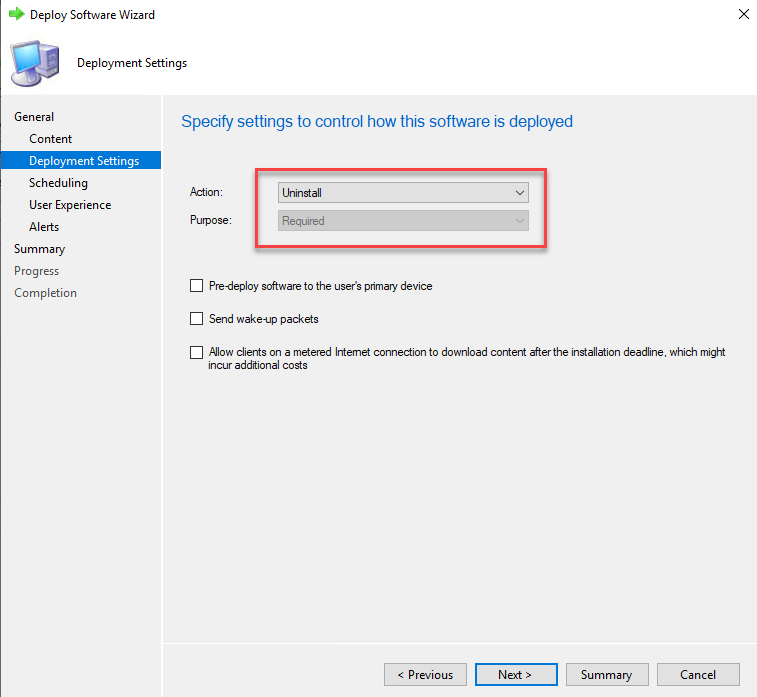
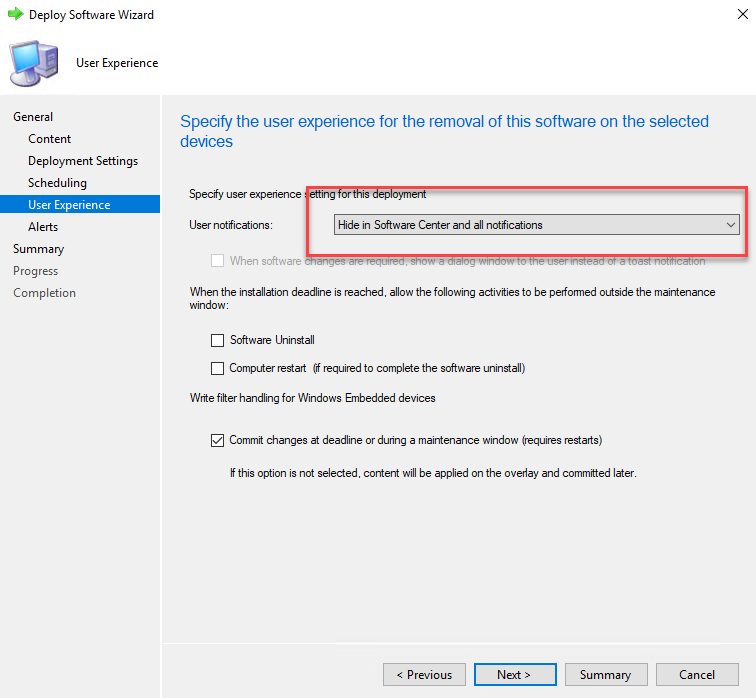
From here you will click Create Application and NEXT through the wizard. Then just deploy as an Uninstall to a collection of All Users (or whoever you want to target). Once again, follow this guide for the steps, except choose Uninstall instead of Install.
That’s it. Just deploy the uninstall to all users and anyone who logs into a ConfigMgr managed device will have the apps de-provisioned.
Intune
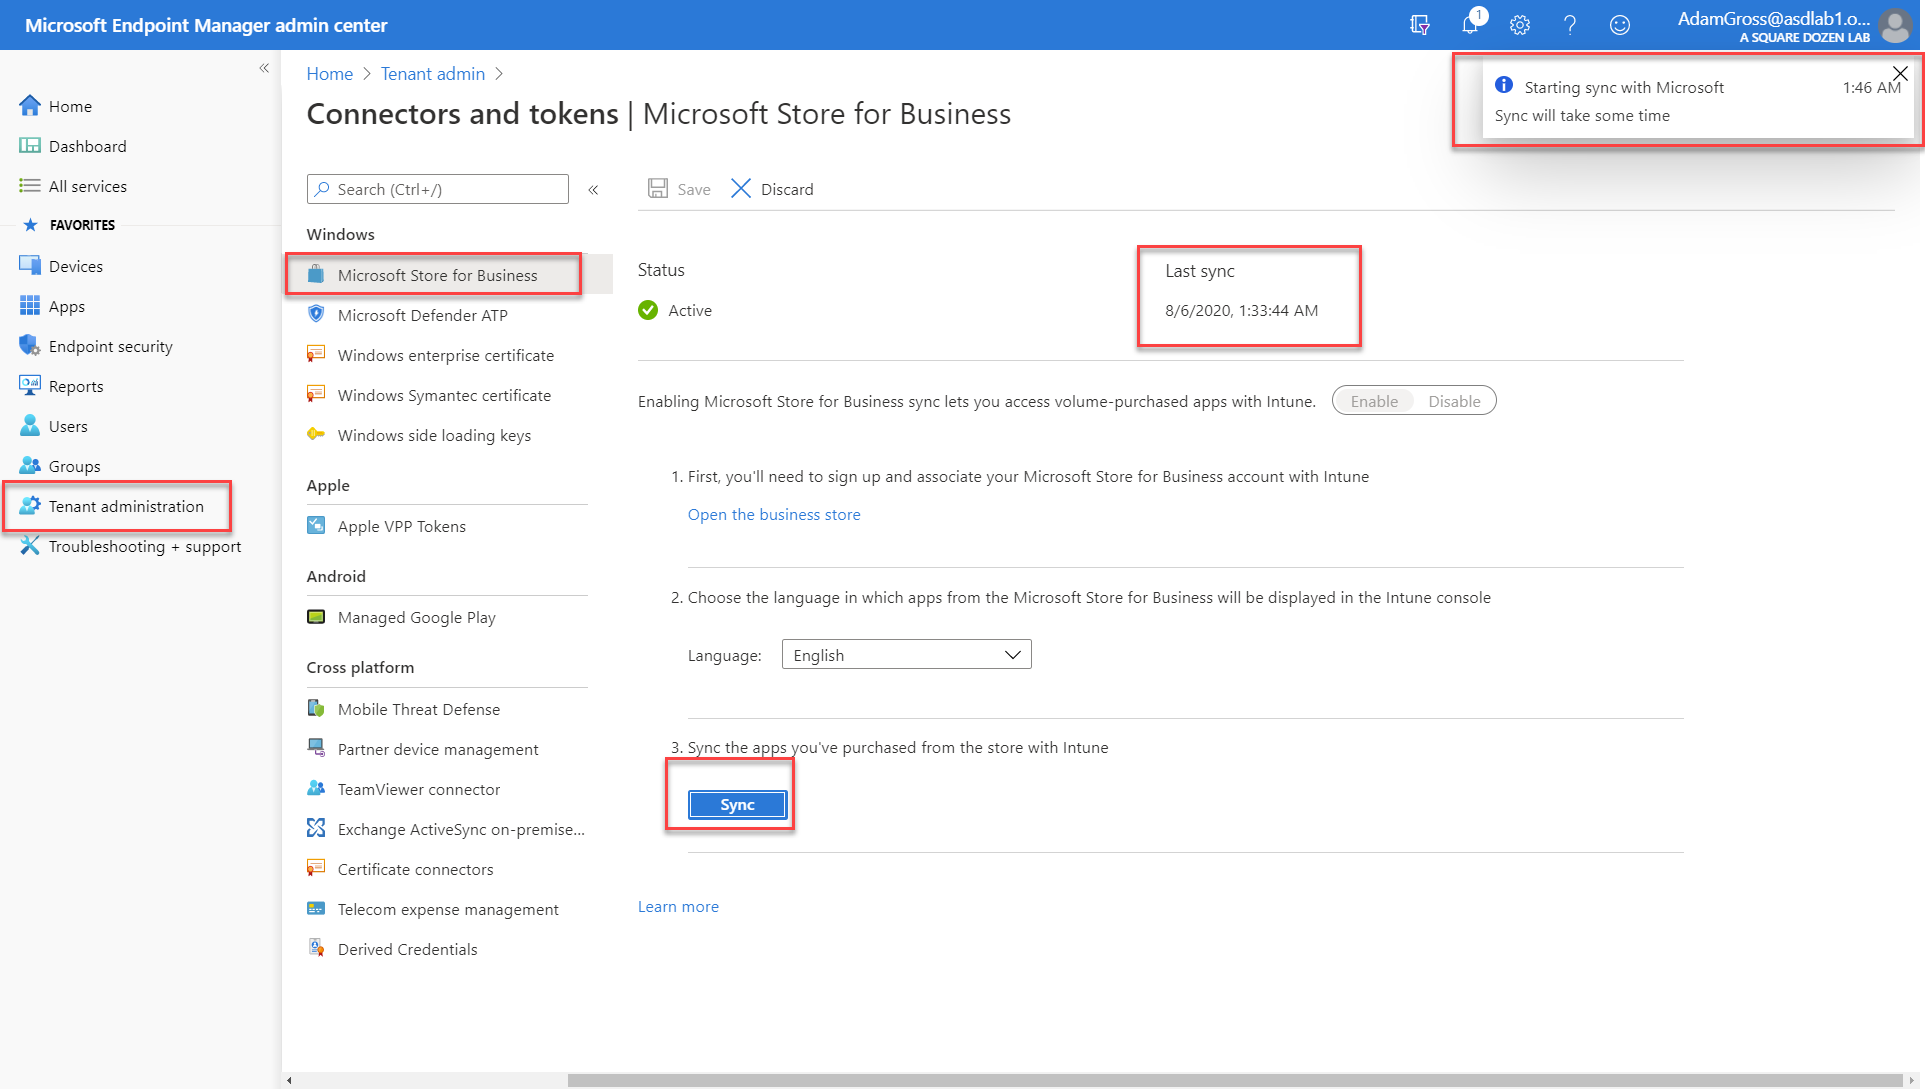
Log into your Intune portal https://endpoint.microsoft.com/ and navigate to Tenant administration > Connectors and tokens > Microsoft Store for Business. Click Sync and wait until Last sync shows an updated date/time.
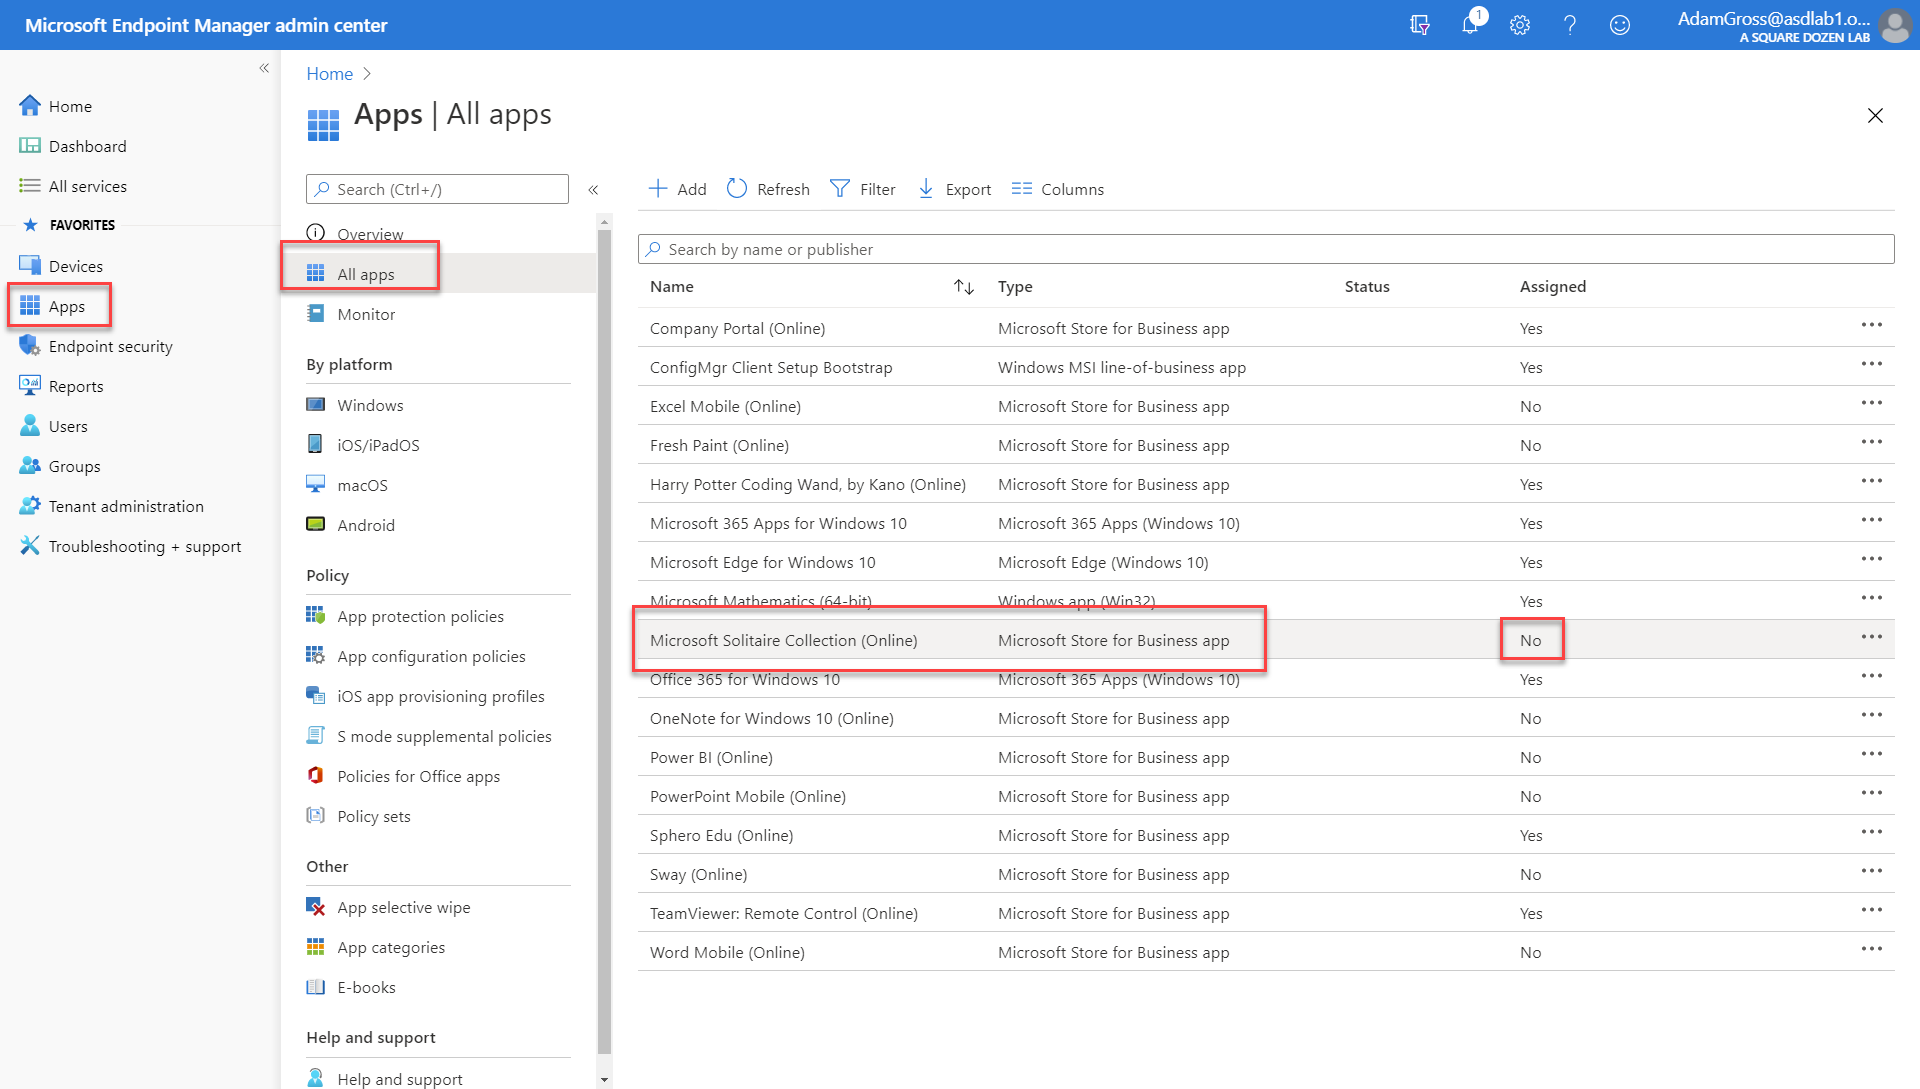
Next navigate to Apps>All apps and look for the newly added apps.
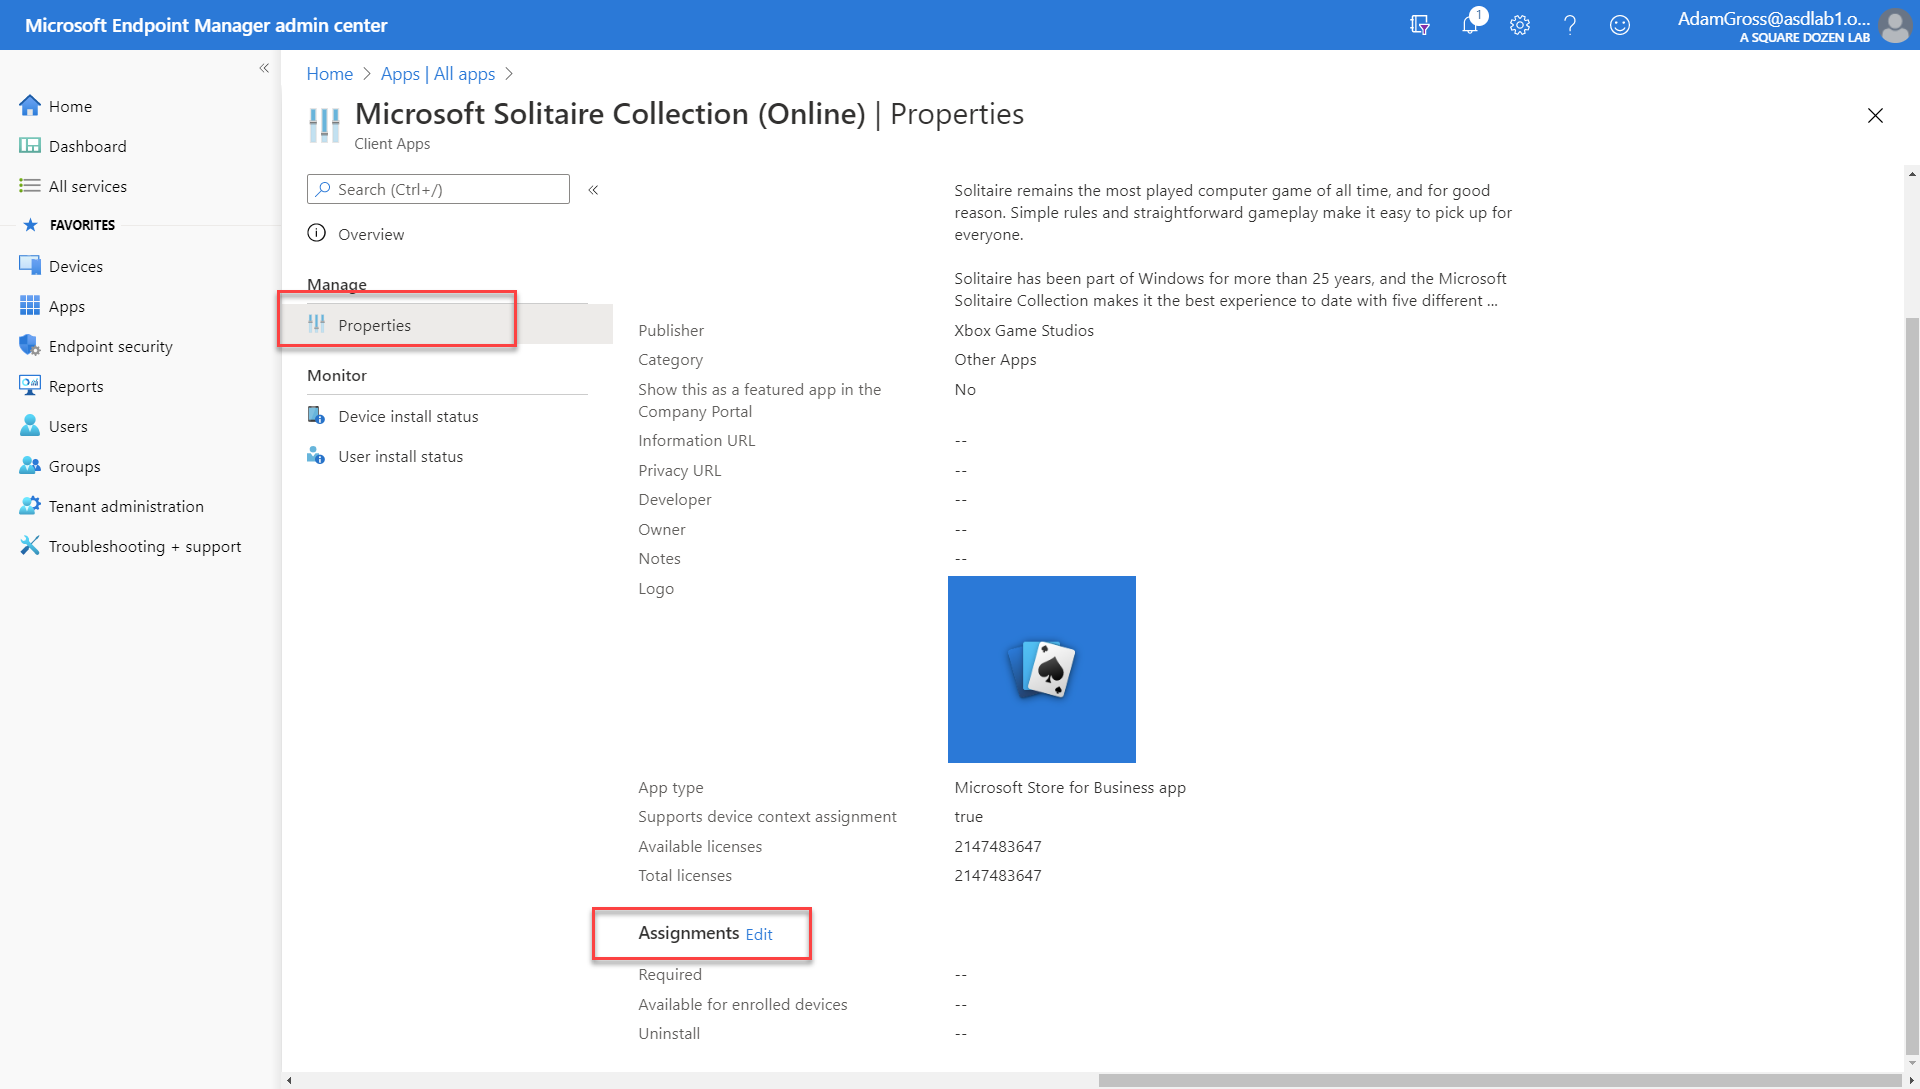
Select the app then click Properties then click Edit next to Assignments
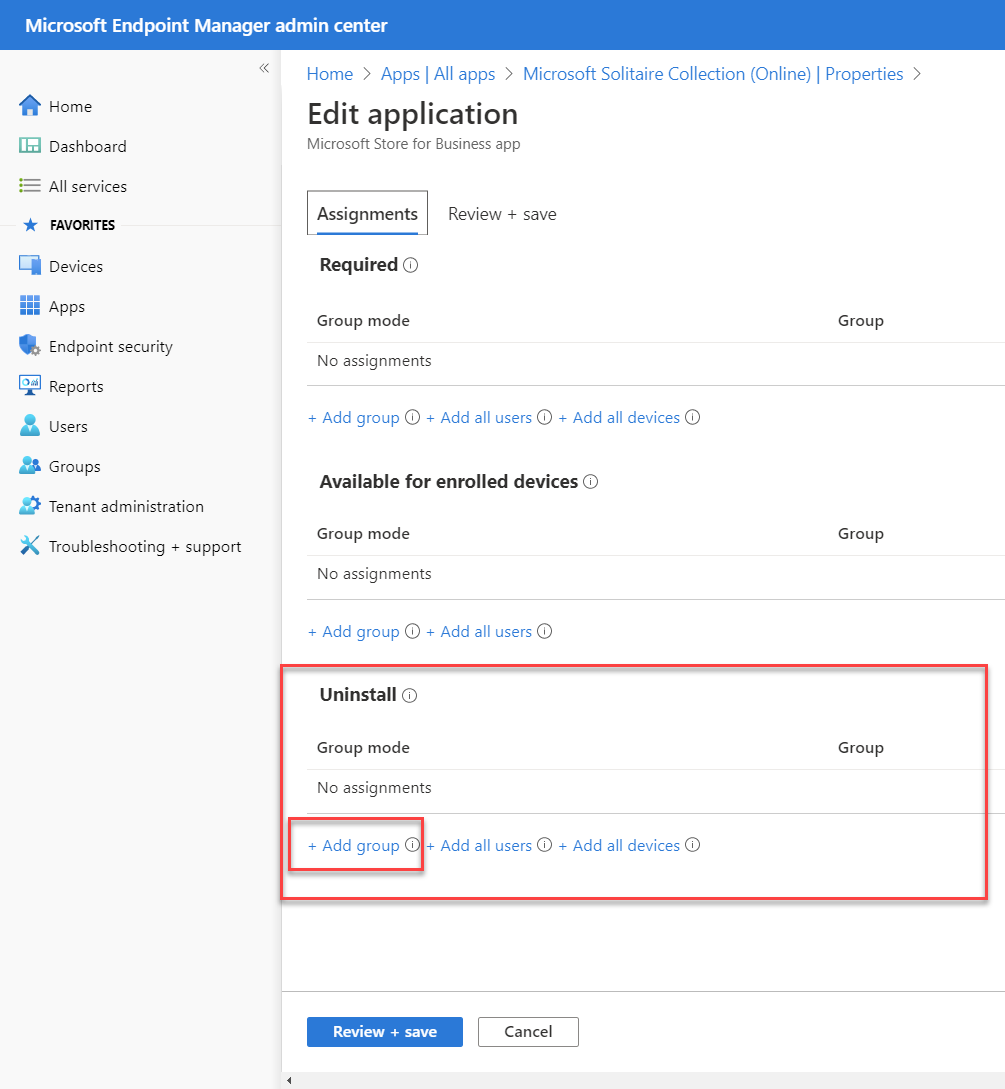
On the Edit application page, under the Uninstall section, select Add group or Add all users. We over at Intune.Training feel strongly about never deploying anything to All Users. Make a custom group that you add users to so you have more control over targeting. All Users is a big hammer approach. Now, your new group should include All Users, but then it’s managed within a custom group instead of being all or nothing with the All Users option listed here. You can also target the devices, but since Store apps are user based, it makes more sense to just target the users. Hopefully this makes sense. Click Review and Save when done.
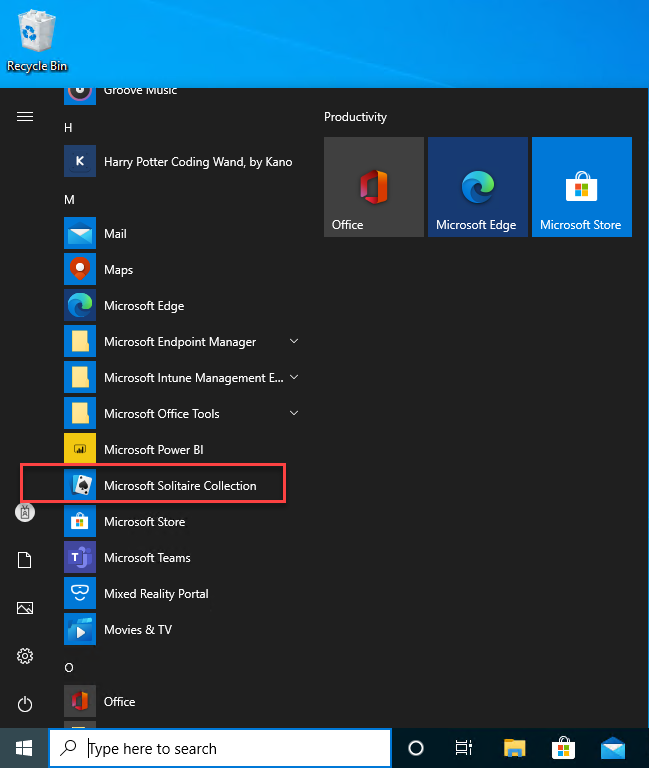
Update Client Policies and Watch the Apps Disappear
ConfigMgr
From the ConfigMgr console, initiate
Intune
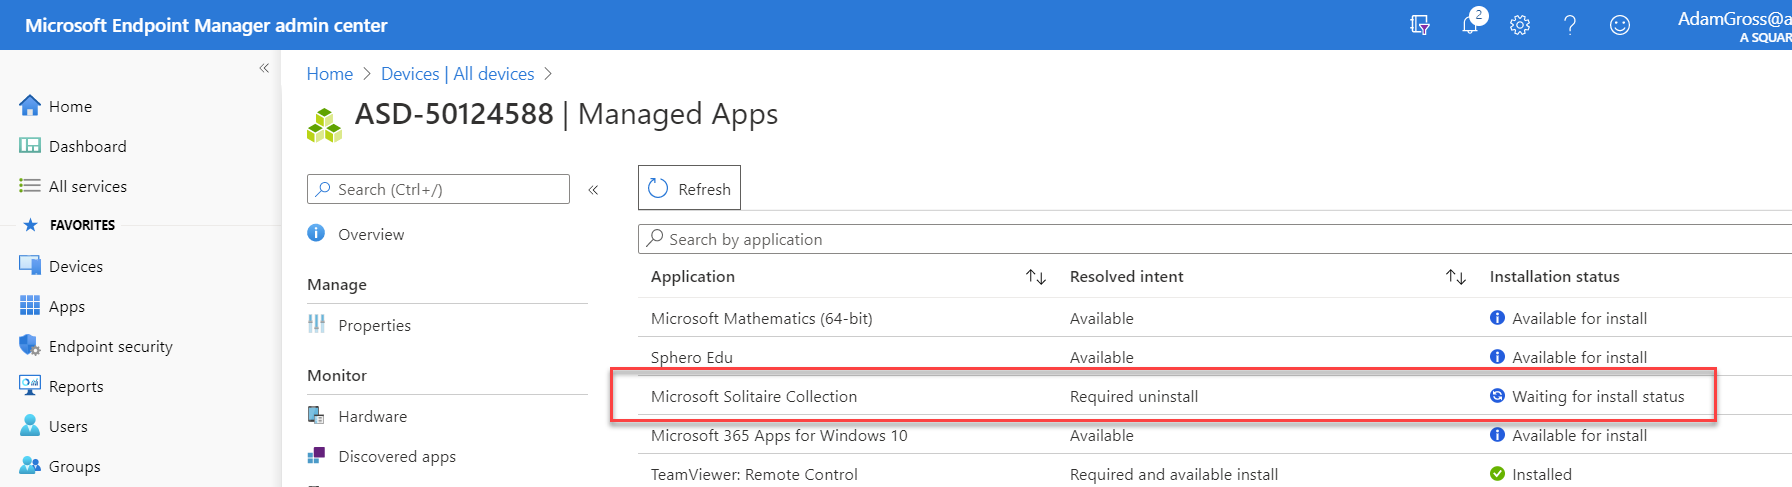
From the Intune Portal, select your test device, Sync it, then check for the app uninstall status.
Summary
As you can see, it take a few steps to get this all set up, but once you’ve got it configured, you shouldn’t have to touch it unless you need to adjust the list of apps you are removing. Plus, if you need to add the apps back in at any point, you can just change the deployment from Uninstall to Install and it will get added back in.
References
Links to some content that I used when writing this post.
- https://techcommunity.microsoft.com/t5/windows-blog-archive/removing-windows-10-in-box-apps-during-a-task-sequence/ba-p/706582
- https://deviceadvice.io/2019/04/20/the-modern-way-to-remove-windows-10-in-box-apps/
- https://www.asquaredozen.com/2019/05/12/deploying-microsoft-store-for-business-apps-from-configmgr/