This is Part 4 in my Configuring 802.1x Authentication for Windows Deployment series. Be sure to check out all of the other parts here.
Quick Note About Cisco Switch Firmware
If you’ve made it this far, a word of caution. Make sure that your switch firmware is matched to the version required by ISE. I spent several weeks working with our Security and Networking guys to troubleshoot and discovered that our switches weren’t at the required version for ISE 2.2. An device plugged in through an IP phone would get blocked by the switch during an In-Place Upgrade and could only reset the port by rebooting the phone. Applying the latest firmware resolved this issue.
If you are using a ConfigMgr Task Sequence to manage In-Place upgrades or Windows 10 Feature Updates, you will want to take a look at this.
A Windows In-Place Upgrade or Feature Update perform in much the same way. The setup media is staged on the machine, then the existing OS is moved to a new Windows.old folder. The new OS, updates and drivers are all applied. Then any apps/data/settings that you chose to migrate are applied. According to the Windows 10 Product Group (via Microsoft Premier Support), an In-Place upgrade should migrate 802.1x settings. However, in my experience, this has not been the case, at least during an In-Place Upgrade Task Sequence.
Here’s what’s supposed to happen
802.1x local profiles as well as 802.1x policies are picked up and moved to a staging location called C:\ProgramData\Microsoft\dot3vc\MigrationData. There are corresponding registry keys as well under HKLM\Software\Microsoft\dot3svc\MigrationData. If you had a GPO Profile applied, it will be converted to a Local Profile and applied until GPO’s can process once the Task Sequence if complete. If you don’t have a GPO, then any Local Profile will be applied. If no Local Profile exists, then why did you turn on 802.1x to begin with?? Actually, you will always have a local profile. If you were to delete your profile and restart dot3svc, a new default profile will be applied. So, that’s what’s SUPPOSED to happen.
Here’s what really happens
The OS migration completes, and your 802.1x profile has been set back to default. When Windows setup finishes, the computer doesn’t reboot, but just calls the Task Sequence environment to resume at the next step. You will see your Task Sequence timeout as it attempts to send a status back to the server. If your next step requires access to the network, it would just fail. You can check your adapter or your 802.1x admin console and see that the computer will have failed to authenticate.
The Problem
The 802.1x migration process doesn’t complete it’s migration until the Wired Authconfig (dot3svc) service is restarted either manually or via reboot. You can reproduce with using standalone upgrade media. When you log in, your authentication profile will be reset to default until you restart dot3svc.
Possible Solutions
There are several options to consider here.
- Ignore initial authentication failures when the Task Sequence resumes and restart dot3svc as the first step after Upgrade Operating System. - This option is bad because you run the risk of having ports blocked after repeated failed authentication attempts. Many of our computers are connected to the LAN through their VOIP phones. If a computer fails authentication twice, that device will be blocked from any further traffic until the phone is rebooted. (This could be environmental for us or a bug, but why risk a bunch of unnecessary failures?)
- Edit the upgrade_bulk.XML file in the Sources directory of your Upgrade media to add the Profile or GPO files to the Include sections. - I have tested and this does work, but it seems less than ideal. the Product Group has a specific process in place to perform this migration in a specific way and I don’t like hacking things up (too much) if I don’t have to. This was a great workaround, but not the best option.
- Edit the SetupCompleteTemplate.cmd and SetupRollbackTemplate.cmd files to restart the service DURING the OS upgrade process so the Task Sequence never fails to authenticate. - This is the option that I’m going go over here. It seems to be the most robust option given the alternatives.
SetupCompleteTemplate.cmd and SetupRollbackTemplate.cmd Files
Thanks for the info Gary Blok!
If you check your C:\Windows\CCM folder, you will find these 2 files sitting there. They are part of your client install payload and the sources can be found on your SCCM Primary server (Though I wouldn’t recommend editing them directly). Make a copy of these files and add them to a new ConfigMgr Package - don’t distribute them yet, we need to edit them. Make 2 folders Original and Modified. Add both files to both folders. Now open the copies from the Modified folder. They should look like this:
SetupCompleteTemplate.cmd
 1
 2
 3
 4
 5
 6
 7
 8
 9
10
11
12
13
14
15
16
17
18
19
20
21
22
23
24
25
26
27
28
29
30
31
32
| @ECHO OFF
REM SCCMClientPath should be set before we get here
REM This script is written by ConfigMgr Task Sequence Upgrade Operating System action
REM SetupComplete.cmd -- Upgrade Complete, calling TSMBootstrap to resume task sequence
echo %DATE%-%TIME% Entering setupcomplete.cmd >> %WINDIR%\setupcomplete.log
echo %DATE%-%TIME% Setting env var _SMSTSSetupRollback=FALSE >> %WINDIR%\setupcomplete.log
set _SMSTSSetupRollback=FALSE
echo %DATE%-%TIME% Setting registry to resume task sequence after reboot >> %WINDIR%\setupcomplete.log
reg add "HKEY_LOCAL_MACHINE\SYSTEM\Setup" /v SetupType /t REG_DWORD /d 2 /f
reg add "HKEY_LOCAL_MACHINE\SYSTEM\Setup" /v CmdLine /t REG_SZ /d "%WINDIR%\SMSTSPostUpgrade\setupcomplete.cmd" /f
echo %DATE%-%TIME% Running %SCCMClientPath%\TSMBootstrap.exe to resume task sequence >> %WINDIR%\setupcomplete.log
%SCCMClientPath%\TSMBootstrap.exe /env:Gina /configpath:%_SMSTSMDataPath% /bootcount:2 /reloadenv
IF %ERRORLEVEL% EQU -2147021886 (
echo %DATE%-%TIME% ERRORLEVEL = %ERRORLEVEL% >> %WINDIR%\setupcomplete.log
echo %DATE%-%TIME% TSMBootstrap requested reboot >> %WINDIR%\setupcomplete.log
echo %DATE%-%TIME% Rebooting now >> %WINDIR%\setupcomplete.log
reg add "HKEY_LOCAL_MACHINE\SYSTEM\Setup" /v SetupShutdownRequired /t REG_DWORD /d 1 /f
) else (
echo %DATE%-%TIME% ERRORLEVEL = %ERRORLEVEL% >> %WINDIR%\setupcomplete.log
echo %DATE%-%TIME% TSMBootstrap did not request reboot, resetting registry >> %WINDIR%\setupcomplete.log
reg add "HKEY_LOCAL_MACHINE\SYSTEM\Setup" /v SetupType /t REG_DWORD /d 0 /f
reg add "HKEY_LOCAL_MACHINE\SYSTEM\Setup" /v CmdLine /t REG_SZ /d "" /f
)
echo %DATE%-%TIME% Exiting setupcomplete.cmd >> %WINDIR%\setupcomplete.log
set SCCMClientPath=
|
SetupRollbackTemplate.cmd
 1
 2
 3
 4
 5
 6
 7
 8
 9
10
11
12
13
14
15
16
17
18
19
20
21
22
23
24
25
26
27
28
29
30
31
32
| @ECHO OFF
REM SCCMClientPath should be set before we get here
REM This script is written by ConfigMgr Task Sequence Upgrade Operating System action
REM SetupRollback.cmd -- Upgrade Rolled back, calling TSMBootstrap to resume task sequence
echo %DATE%-%TIME% Entering setuprollback.cmd >> %WINDIR%\setuprollback.log
echo %DATE%-%TIME% Setting env var _SMSTSSetupRollback=TRUE >> %WINDIR%\setuprollback.log
set _SMSTSSetupRollback=TRUE
echo %DATE%-%TIME% Setting registry to resume task sequence after reboot >> %WINDIR%\setuprollback.log
reg add "HKEY_LOCAL_MACHINE\SYSTEM\Setup" /v SetupType /t REG_DWORD /d 2 /f
reg add "HKEY_LOCAL_MACHINE\SYSTEM\Setup" /v CmdLine /t REG_SZ /d "%WINDIR%\SMSTSPostUpgrade\setuprollback.cmd" /f
echo %DATE%-%TIME% Running %SCCMClientPath%\TSMBootstrap.exe to resume task sequence >> %WINDIR%\setuprollback.log
%SCCMClientPath%\TSMBootstrap.exe /env:Gina /configpath:%_SMSTSMDataPath% /bootcount:2 /reloadenv
IF %ERRORLEVEL% EQU -2147021886 (
echo %DATE%-%TIME% ERRORLEVEL = %ERRORLEVEL% >> %WINDIR%\setuprollback.log
echo %DATE%-%TIME% TSMBootstrap requested reboot >> %WINDIR%\setuprollback.log
echo %DATE%-%TIME% Rebooting now >> %WINDIR%\setuprollback.log
reg add "HKEY_LOCAL_MACHINE\SYSTEM\Setup" /v SetupShutdownRequired /t REG_DWORD /d 1 /f
) else (
echo %DATE%-%TIME% ERRORLEVEL = %ERRORLEVEL% >> %WINDIR%\setuprollback.log
echo %DATE%-%TIME% TSMBootstrap did not request reboot, resetting registry >> %WINDIR%\setuprollback.log
reg add "HKEY_LOCAL_MACHINE\SYSTEM\Setup" /v SetupType /t REG_DWORD /d 0 /f
reg add "HKEY_LOCAL_MACHINE\SYSTEM\Setup" /v CmdLine /t REG_SZ /d "" /f
)
echo %DATE%-%TIME% Exiting setuprollback.cmd >> %WINDIR%\setuprollback.log
set SCCMClientPath=
|
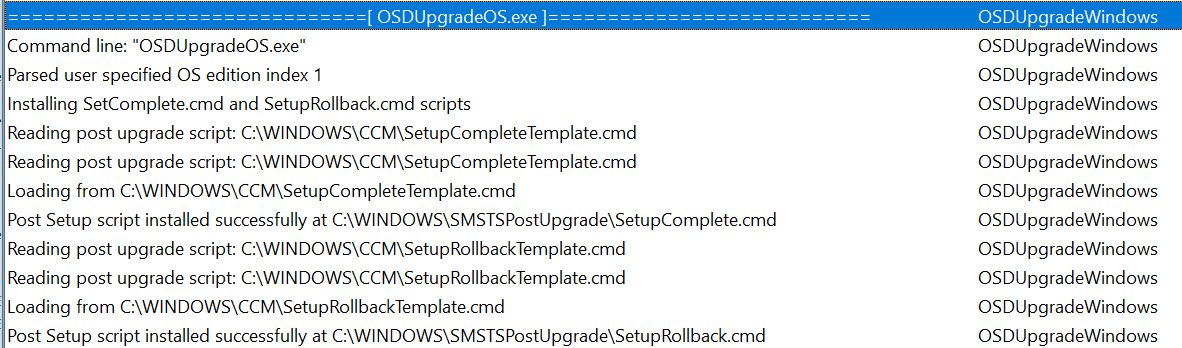
These files are used by the OSDUpgrade.exe process during the Task Sequence to manage reboots and resume the Task Sequence as needed during the upgrade process. They run with every reboot AFTER Windows Setup completes, so they are the perfect place for us to add our service restart. If you look at the Upgrade Operating System step in the SMSTS.log, you will see an entry like this:
These files are appended to your Windows setup command line like this:
"C:\_SMSTaskSequence\Packages\XXXXXXXXXX\SETUP.EXE" /ImageIndex 1 /auto Upgrade /quiet /noreboot /postoobe "C:\WINDOWS\SMSTSPostUpgrade\SetupComplete.cmd" /postrollback "C:\WINDOWS\SMSTSPostUpgrade\SetupRollback.cmd"
Modifications for 802.1x
Here’s the block of code that I added to my files. You can choose to do more or less. The only one you REALLY need is the restart-service step.
1
2
3
4
5
6
7
8
| //Custom Configuration
echo %DATE%-%TIME% "Custom Configuration" >> %WINDIR%\setupcomplete.log
echo %DATE%-%TIME% "Restarting Wired Autoconfig Services" >> %WINDIR%\setupcomplete.log
powershell.exe -command "restart-service dot3svc -PassThru -verbose;" >> %WINDIR%\setupcomplete.log
ping localhost -n 15
netsh lan show interfaces >> %WINDIR%\setupcomplete.log
netsh lan show Profiles >> %WINDIR%\setupcomplete.log
//End Custom Configuration
|
These commands will restart the dot3svc then ping local host for 15 seconds (easy way to add a sleep) then log the output of netsh commands for review later if something fails. I made a point previously of mentioning that I’m using a Batch file instead of Powershell for ease of support, yet here I’m using PowerShell to restart the service. What I found was that the alternative commands like NET or SC must be called as separate STOP and START commands and I had issues with the script waiting for the service to fully stop before attempting to start. PowerShell’s Restart-Service handles all of this nicely. Just trying to use the right tool for the job.
Here’s what your files should look like:
SetupCompleteTemplate.cmd
 1
 2
 3
 4
 5
 6
 7
 8
 9
10
11
12
13
14
15
16
17
18
19
20
21
22
23
24
25
26
27
28
29
30
31
32
33
34
35
36
37
38
39
40
41
| @ECHO OFF
REM SCCMClientPath should be set before we get here
REM This script is written by ConfigMgr Task Sequence Upgrade Operating System action
REM SetupComplete.cmd -- Upgrade Complete, calling TSMBootstrap to resume task sequence
echo %DATE%-%TIME% Entering setupcomplete.cmd >> %WINDIR%\setupcomplete.log
echo %DATE%-%TIME% Setting env var _SMSTSSetupRollback=FALSE >> %WINDIR%\setupcomplete.log
set _SMSTSSetupRollback=FALSE
echo %DATE%-%TIME% Setting registry to resume task sequence after reboot >> %WINDIR%\setupcomplete.log
reg add "HKEY_LOCAL_MACHINE\SYSTEM\Setup" /v SetupType /t REG_DWORD /d 2 /f
reg add "HKEY_LOCAL_MACHINE\SYSTEM\Setup" /v CmdLine /t REG_SZ /d "%WINDIR%\SMSTSPostUpgrade\setupcomplete.cmd" /f
:: //Custom Configuration
echo %DATE%-%TIME% "Custom Configuration" >> %WINDIR%\setupcomplete.log
echo %DATE%-%TIME% "Restarting Wired Autoconfig Services" >> %WINDIR%\setupcomplete.log
powershell.exe -command "restart-service dot3svc -PassThru -verbose;" >> %WINDIR%\setupcomplete.log
ping localhost -n 15
netsh lan show interfaces >> %WINDIR%\setupcomplete.log
netsh lan show Profiles >> %WINDIR%\setupcomplete.log
:: // End Custom Configuration
echo %DATE%-%TIME% Running %SCCMClientPath%\TSMBootstrap.exe to resume task sequence >> %WINDIR%\setupcomplete.log
%SCCMClientPath%\TSMBootstrap.exe /env:Gina /configpath:%_SMSTSMDataPath% /bootcount:2 /reloadenv
IF %ERRORLEVEL% EQU -2147021886 (
echo %DATE%-%TIME% ERRORLEVEL = %ERRORLEVEL% >> %WINDIR%\setupcomplete.log
echo %DATE%-%TIME% TSMBootstrap requested reboot >> %WINDIR%\setupcomplete.log
echo %DATE%-%TIME% Rebooting now >> %WINDIR%\setupcomplete.log
reg add "HKEY_LOCAL_MACHINE\SYSTEM\Setup" /v SetupShutdownRequired /t REG_DWORD /d 1 /f
) else (
echo %DATE%-%TIME% ERRORLEVEL = %ERRORLEVEL% >> %WINDIR%\setupcomplete.log
echo %DATE%-%TIME% TSMBootstrap did not request reboot, resetting registry >> %WINDIR%\setupcomplete.log
reg add "HKEY_LOCAL_MACHINE\SYSTEM\Setup" /v SetupType /t REG_DWORD /d 0 /f
reg add "HKEY_LOCAL_MACHINE\SYSTEM\Setup" /v CmdLine /t REG_SZ /d "" /f
)
echo %DATE%-%TIME% Exiting setupcomplete.cmd >> %WINDIR%\setupcomplete.log
set SCCMClientPath=
|
SetupRollbackTemplate.cmd
 1
 2
 3
 4
 5
 6
 7
 8
 9
10
11
12
13
14
15
16
17
18
19
20
21
22
23
24
25
26
27
28
29
30
31
32
33
34
35
36
37
38
39
40
41
| @ECHO OFF
REM SCCMClientPath should be set before we get here
REM This script is written by ConfigMgr Task Sequence Upgrade Operating System action
REM SetupRollback.cmd -- Upgrade Rolled back, calling TSMBootstrap to resume task sequence
echo %DATE%-%TIME% Entering setuprollback.cmd >> %WINDIR%\setuprollback.log
echo %DATE%-%TIME% Setting env var _SMSTSSetupRollback=TRUE >> %WINDIR%\setuprollback.log
set _SMSTSSetupRollback=TRUE
echo %DATE%-%TIME% Setting registry to resume task sequence after reboot >> %WINDIR%\setuprollback.log
reg add "HKEY_LOCAL_MACHINE\SYSTEM\Setup" /v SetupType /t REG_DWORD /d 2 /f
reg add "HKEY_LOCAL_MACHINE\SYSTEM\Setup" /v CmdLine /t REG_SZ /d "%WINDIR%\SMSTSPostUpgrade\setuprollback.cmd" /f
//Custom Configuration
echo %DATE%-%TIME% "Custom Configuration" >> %WINDIR%\setupcomplete.log
echo %DATE%-%TIME% "Restarting Wired Autoconfig Services" >> %WINDIR%\setupcomplete.log
powershell.exe -command "restart-service dot3svc -PassThru -verbose;" >> %WINDIR%\setupcomplete.log
ping localhost -n 15
netsh lan show interfaces >> %WINDIR%\setupcomplete.log
netsh lan show Profiles >> %WINDIR%\setupcomplete.log
:: // End Custom Configuration
echo %DATE%-%TIME% Running %SCCMClientPath%\TSMBootstrap.exe to resume task sequence >> %WINDIR%\setuprollback.log
%SCCMClientPath%\TSMBootstrap.exe /env:Gina /configpath:%_SMSTSMDataPath% /bootcount:2 /reloadenv
IF %ERRORLEVEL% EQU -2147021886 (
echo %DATE%-%TIME% ERRORLEVEL = %ERRORLEVEL% >> %WINDIR%\setuprollback.log
echo %DATE%-%TIME% TSMBootstrap requested reboot >> %WINDIR%\setuprollback.log
echo %DATE%-%TIME% Rebooting now >> %WINDIR%\setuprollback.log
reg add "HKEY_LOCAL_MACHINE\SYSTEM\Setup" /v SetupShutdownRequired /t REG_DWORD /d 1 /f
) else (
echo %DATE%-%TIME% ERRORLEVEL = %ERRORLEVEL% >> %WINDIR%\setuprollback.log
echo %DATE%-%TIME% TSMBootstrap did not request reboot, resetting registry >> %WINDIR%\setuprollback.log
reg add "HKEY_LOCAL_MACHINE\SYSTEM\Setup" /v SetupType /t REG_DWORD /d 0 /f
reg add "HKEY_LOCAL_MACHINE\SYSTEM\Setup" /v CmdLine /t REG_SZ /d "" /f
)
echo %DATE%-%TIME% Exiting setuprollback.cmd >> %WINDIR%\setuprollback.log
set SCCMClientPath=
|
Note: Make sure your command lines are BEFORE this line or the Task Sequence will be re-initialized before the service is restarted and you will still see some timeouts.
%SCCMClientPath%\TSMBootstrap.exe /env:Gina /configpath:%_SMSTSMDataPath% /bootcount:2 /reloadenv
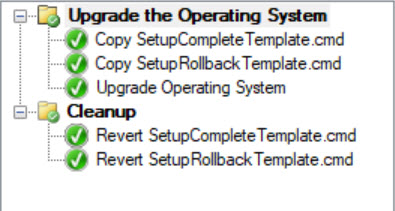
Update Your In-Place Upgrade Task Sequence
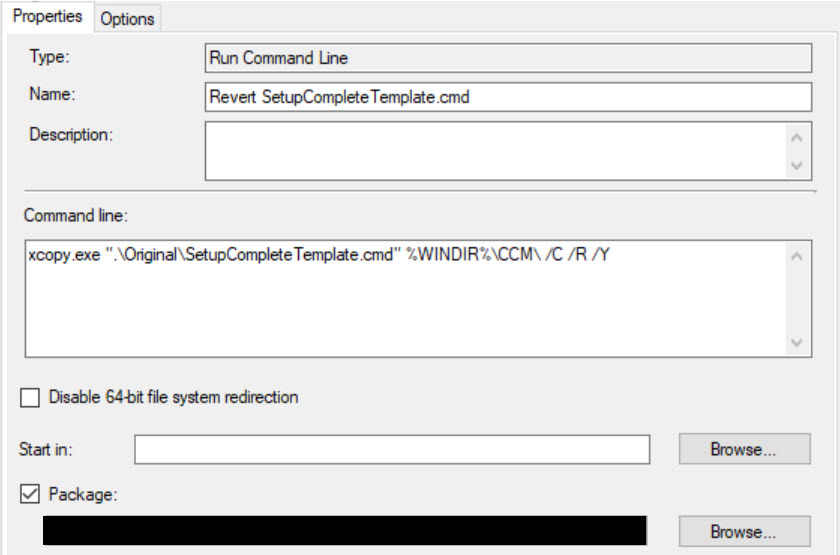
You should now have 4 files, 2 Modified and 2 Original. We will add these files to your In-Place Upgrade Task Sequence. The Modified files will be copied down to replace the current files then the Original files will be copied down post-upgrade so we aren’t leaving behind non-default files.
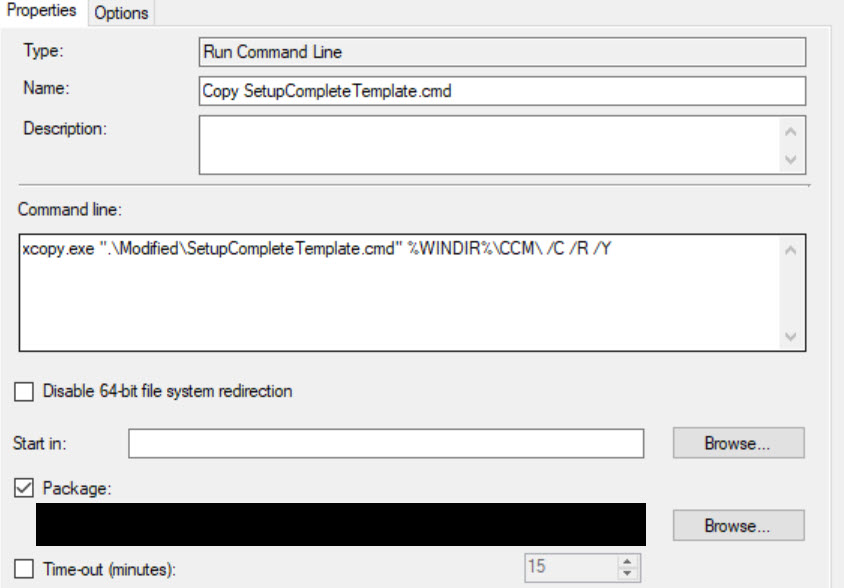
Add Run Command Line steps before and after your Upgrade Task Sequence step using the following command lines:
1
2
| xcopy.exe ".\Modified\SetupCompleteTemplate.cmd" %WINDIR%\CCM\ /C /R /Y
xcopy.exe ".\Modified\SetupRollbackTemplate.cmd" %WINDIR%\CCM\ /C /R /Y
|
1
2
| xcopy.exe ".\Original\SetupCompleteTemplate.cmd" %WINDIR%\CCM\ /C /R /Y
xcopy.exe ".\Original\SetupRollbackTemplate.cmd" %WINDIR%\CCM\ /C /R /Y
|
It should look something like this:
That’s it! If you went through all 4 parts with me, you should be able to image machines anywhere that has 802.1x network authentication in place.
Check out Part 5 for how to skip all of this and just use a web service to whitelist!!