This is Part 5 in my Configuring 802.1x Authentication for Windows Deployment series. Be sure to check out all of the other parts.
A few months ago, when I published the first 4 parts on this series, I was unaware that there was a web service available for managing Cisco ISE, which is the NAC that I have to work with in my environment. I was fortunate to meet with a peer who works nearby and he shared a script demonstrating how to interact with the Cisco ISE External RESTful Service (ERS) to dynamically whitelist devices when WinPE starts for Bare Metal OSD and inside an SCCM/ConfigMgr Task Sequence for In-Place upgrades. I built a script to use some of the newer features inside the ISE 2.2 service and includes logic to work with PowerShell 3.0 since most of my environment is still on Windows 7 and the Invoke-RestMethod and Invoke-WebRequest cmdlets don’t work properly in PowerShell 3.0. My plan is to replace all of the things the components that I built in the first 4 parts of this series with this script. Some of the steps I describe were completed by my ISE administrator. I don’t have access to the admin console, so I have limited information about how some items are configured. Please let me know if you get stuck and I can ask for better information.
Please note, the goal of this script is to give you the framework to build a solution for your needs and to provide one more set of tools to work with. It is not designed to be one-size-fits-all.
The Steps
- Enable ERS in ISE, Create an auto-purging whitelisting group in ISE and configure ISE to accept traffic from WinPE
- Test the whitelisting PowerShell script standalone
- Update your Boot WIM to include the whitelisting PowerShell script
- Update your In-Place Upgrade Task Sequence to run the whitelisting PowerShell script before the OS upgrade.
Enabling ERS on your ISE Server
Before you begin configuring ERS, here are a few things that I learned.
- You must use an ISE built-in account, not a domain authenticated account.
- You must use an ERS admin account. The ERS user account doesn’t have access to the ERS.
- A great tool for testing the API is Postman or you can use the browser extensions referenced in the article below.
Start Here – This guide will walk you through configuring ERS on your server. Here is a PDF version of it in case the source ever changes.
Next, have your ISE administrator create a new endpoint Group. You should configure the group to automatically remove endpoints after 24 hours. This will prevent failed devices from being orphaned in the group. Additionally, the restricted DACL needs to be configured to redirect traffic to the ISE server’s primary admin node (Per our admin. Not sure how he did this…).
Whitelisting MAC Addresses
I originally intended to build a full PowerShell module to able you to fully manage ERS with PowerShell but it just turned into a huge undertaking so I decided to just go with the most important bits. The script has examples in the comments at the top, so it should be straightforward to execute.
Note 1: The ISEServerList.txt file is used to map Gateways to ISE Servers for locations that have several ISE servers (we do). If you only have 1 server, use the -Server parameter on your command line.
Note 2: The script will grab the currently active MAC address and whitelist it. You can use the -MACAddress parameter to specify a specific MAC Address if required.
The script performs 3 main functions based on the parameters that you provide.
- Creates new EndPoint from MAC Address.
- Updates EndPoint’s Group to a special WhiteListing group that you specify.
- Deletes the EndPoint’s MAC record from ISE.
You can download the whitelisting script and all related files from my GitHub repo. The length of the script made posting inline prohibitive.
Integrating the script into WinPE
If you followed the previous steps in this series, you should already have most if this in place. We are going to update the OSDInjection.XML file to include our new script and the ISEServers.txt file (optional). Before you do this, be sure that your script works and that you can add and remove a machine from your whitelisting group. I suggest booting into WinPE then running the script from a USB to test.
If you want details on how to edit your OSDInjection.XML and winpeshl.ini files, please refer to the previous posts in this series. Also, I’ve included sample files in the GitHub repo with the whitelisting script.
Note: I tested adding the script to a new boot image and kept getting SSL errors from the script. I added my root cert to the media boot image (just like in the machine auth setup) and it resolved the issue. Plus it adds an extra level of security.
Updating your Upgrade Task Sequence
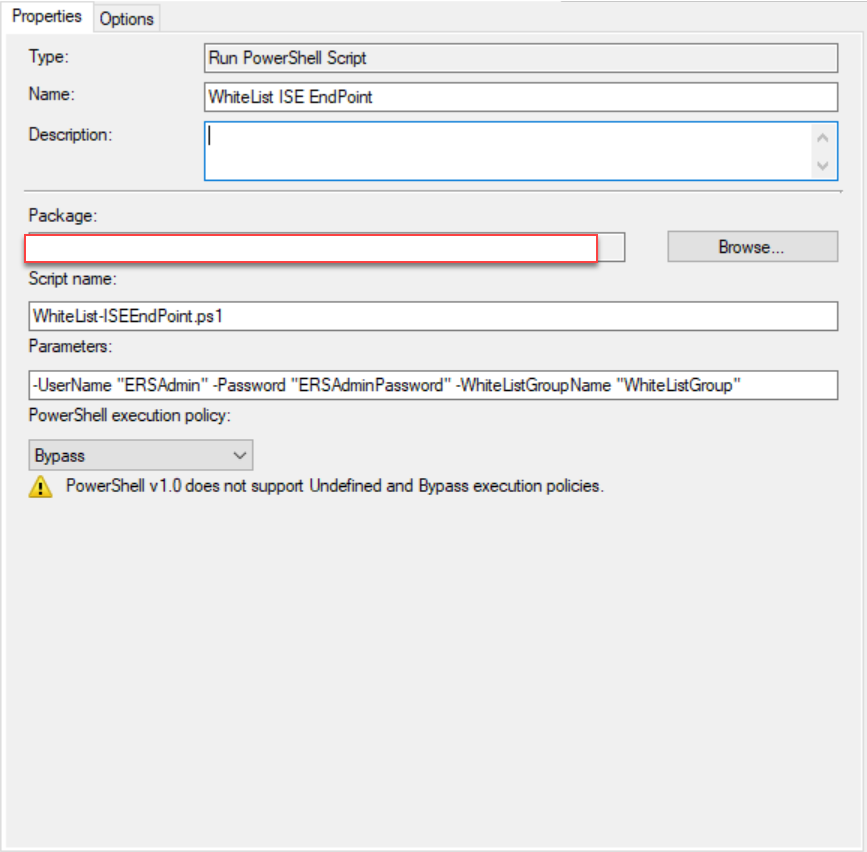
Simply add a Run PowerShell Script step to the beginning of your Task Sequence to launch the script.

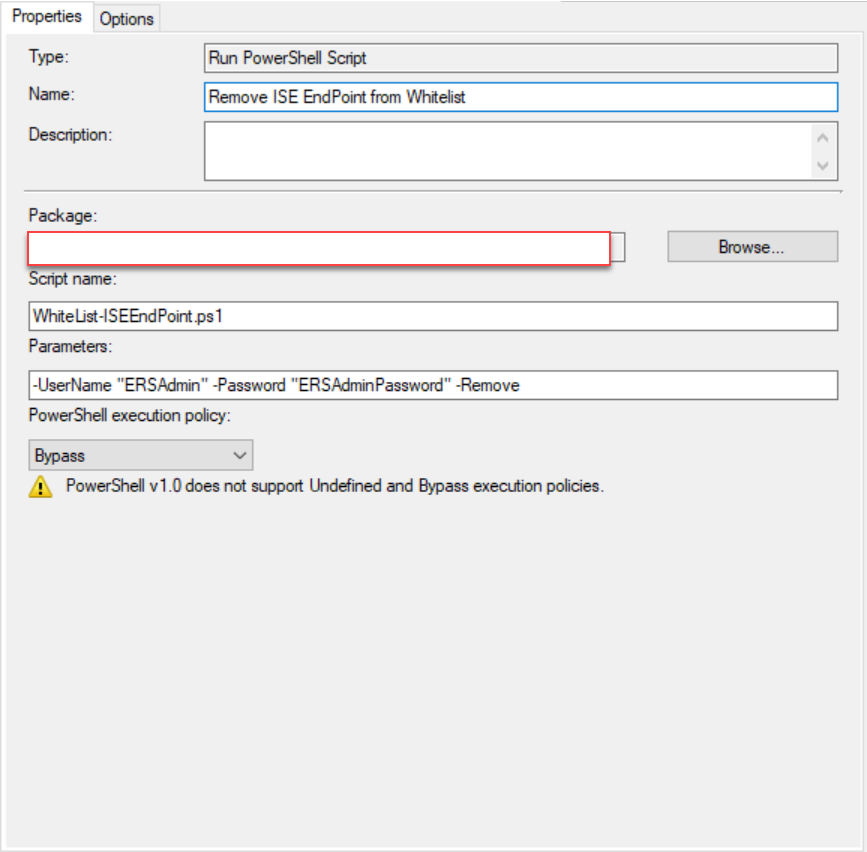
Add a second Run PowerShell Script step to the end of your Task Sequence to remove the MAC endpoint from ISE.

You may also consider importing your 802.1x GPO settings at this point, but once you’ve joined your machine to the domain and the machine cert is created (assuming you use machine certs for auth), it should automatically get configured in ISE.
You should be able to remove the custom Unattend.XML, SetupComplete and SetupRollback entries that you added in the previous steps in the series and just rely on the ERS whitelist to handle auth.
Summary
Sorry if this isn’t a full step-by-step of the complete process. I just needed to get this information and the script out for people to begin working with. If you have questions or concerns, please feel free to reach out to me here on on Twitter (@AdamGrossTX) and I’ll see what I can do to help.
In case you missed the link above you can download everything from my GitHub repo Here
Don’t forget to check out the Tips & Tricks page.
18 Comments
Mike Mitchell
October 2, 2018 at 9:06 amAwesome information! I have a question. We are upgrading to Win10 from Win7. We wish to do inplace upgrades but we are having trouble getting around ISE. Did you guys have to uninstall AnyConnect when upgrading?
Adam Gross
October 2, 2018 at 9:17 amI am in the process of testing the new script fully integrated into my InPlace upgrade TS now. I should have more information by the end of the day, however, I fully expect it to work as described since the individual parts work. We are removing AnyConnect in the TS before upgrading due to compat issues. Also, we aren’t putting it back on. It really depends on where the failures are occurring in the upgrade process and how your ISE auth is configured. We use the Windows supplicant instead of AnyConnect, so we didn’t have a dependency on it for ISE auth. The major issue we found was that the 802.1x config gets removed during the upgrade and doesn’t get put back down until after a few reboots and the TS will see failures until it is reapplied by the upgrade process. I can email you directly at the email attached to your comment (don’t post it in plain text here) if you need further assistance. Just let me know.
Mike Mitchell
October 2, 2018 at 9:43 amYes that would be great! Thank you Adam. It would be idea if we use the AnyConnect Client for auth. We always have and we also use other AC modules for VPN, AMP, Posturing, etc… I know Cisco used to recommend you uninstall AC before upgrading from Win 7 to Win 10. Was just wondering what you guys did. If we use the solution you mapped out above that would be excellent!
Daniel Kline
November 8, 2018 at 7:19 amAt what point does the API Call Happen? Is that being called in WIN-PE or before the device is being rebooted into WIN-PE?
Adam Gross
November 8, 2018 at 7:23 amIt is launched by winpeshl.exe when PE loads. ISE has to profile the PXE boot properly and allow that protocol so the devices can get to the PXE server and download the WIM. If ISE isn’t/can’t be configured to allow PXE, you’d need to pre-whitelist the device wither with the script in this post or through your ISE console.
Daniel Kline
November 8, 2018 at 9:12 amThank you! Do you know of anyway the script can be called by the previous running operating system before the reboot into PE?
Adam Gross
November 8, 2018 at 9:15 amSure. You just add it as a Run PowerShell Script in your Task Sequence before your reboot step. It works in PE and in Windows and can be used for Bare Metal (F12/PXE) and InPlace upgrades or it can be run manually before you begin imaging your machines.
Daniel Kline
November 8, 2018 at 1:40 pmThank You. Sorry – I am the ISE administrator, so I am playing catch up on how this all works. Last question – I’m assuming the script needs to be loaded locally on the Win7 device so it can be called by the SCCM task? Or maybe SCCM can have a task to push it down?
Adam Gross
November 8, 2018 at 8:07 pmWhen you set up the Run PowerShell Command step in the Task Sequence, you specific package content and it the TS will cache it locally when it needs to run it then remove it when it’s done. However, there’s nothing special about where the script is run. As long as you pass in a MAC address and an ISE servername, password and group, you can run it from wherever.
Vince Low
June 24, 2019 at 1:01 pmThanks Adam. This stuff is awesome. I even had our Cisco SE reference this blog post. Thank you for sharing your knowledge. Can you ask your ISE resource how they profile the PXE boot properly? There’s an art to profiling, and I’m having a hard time tracking down unique identifiers in the DHCP request that accurately profiles it as PXE. Although this all could be avoided if the dynamic whitelist MAC add PS script is ran on the previous operating system.
Andrew
January 23, 2019 at 1:43 pmHi, is there any way you can have your ISE admin elaborate on this bit: “Additionally, the restricted DACL needs to be configured to redirect traffic to the ISE server’s primary admin node.” I’m trying to implement this with my ISE administrator and he asked if we could get some more clarification around this part here. Thanks!
Tom
June 27, 2019 at 5:22 amGreat solution, but how do you solve the security issue? 1. Allowing a client to directly access the ISE 2.Getting firewall rules in place top enable this at all for different network parts.
Dave Wall
August 1, 2019 at 11:33 amHi Adam, thanks for putting this documentation together. We have successfully used a temporary certificate (not allowed more than 6 months) to get through the build. Then when the machine comes up on the network it gets another cert from GPO (call it PROD CERT) to allow it to access the network indefinitely (the cert is renewable). We have a problem though as the machine drops off the network at around the 90min mark (GPO refresh). In the ISE logs we notice that when the machine gets its PROD CERT from GPO that the machine stops using the USERNAME for the temp cert and starts using the PROD CERT username (both certs are available in the personal cert store and simple certificate selection is used), but it puts “HOST/” in front of the username submitted to ISE. ISE rejects this and network access is denied. If we look at an existing machine that is successfully accessing the network through NAC (not part of our build process) it does not have the “HOST/” piece in front of the PROD CERT username. When I delete both the TEMP and PROD certs and run GPO on a non-NAC port, then return the machine to a NAC port is accesses the NAC protect network and works indefinitely.
Really stuck on this and would appreciate any insight into this.
Adam Gross
August 2, 2019 at 11:11 amThe HOST/ isn’t the problem, It is a symptom of the problem. You will see HOST/ or MAC addresses only for devices that haven’t matched to one of your NAC Auth profiles. It sounds like when the device changes certs that the adapter isn’t being reconfigured to use the correct auth for the CERT. I would guess that the device isn’t getting the correct AUTH profile changes on the adapter at the time of the switch.
For our production OSD TS, we call a Certutil – pulse in the TS then we GPUPDATE at the end of the TS using SMSTSPostAction variable when the device is out of provisioning mode.
Glad to help take a look if you need a hand. Ping me if you need a hand.
Michael
January 21, 2020 at 12:31 pmGreat work!
One little script modification and it works as customer expected 🙂
Lenney
March 10, 2020 at 10:03 amHi Adam! Thank you for posting it. I had a quick question. Will there be security concerns to embed the ESR username and password or passing it as a parameter?
Adam Gross
March 10, 2020 at 10:31 amYes. There definitely are. You should use caution or even encrypt the password or add a password to PXE to add an extra layer of security if you need it.
Ken J
September 22, 2020 at 3:36 amHi Adam
Great job on this post. I’m curious though. When you begin re-enrolling a machine, the MAC Address is added to the Endpoint Group in ISE and the device is Authorized to access AD, PKI and other services required to enroll.
So in my logic, the computer must be joined to AD before being able to receive a Certificate from PKI. I’m being told once the machine is joined to AD, it receives it’s GPO’s and then it must reboot to continue the process. When it receives it’s GPO this should include the Wired 802.1X Profile, but it does not yet have a certificate, so when it reboots wouldn’t it come back up and attempt to authenticate using example EAP-TLS but with no valid certificate and then become stuck?
Could this propose an issue?