This is Part 2 in my Configuring 802.1x Authentication for Windows Deployment series. Be sure to check out all of the other parts here.
Note: I don’t have 802.1x setup in a lab to show how to configure the 802.1x service on the server side. However, I do know that you will need to configure your 802.1x service to allow PXE traffic. I believe that Cisco ISE has a setting already that you can just turn on to allow it. So, if you can’t even PXE in on an 802.1x enabled port, you will need to start there. According to my ISE admin, the switch is configured to spy on DHCP requests. ISE applied the appropriate authorization policy based on the type of request. You will need to work with your 802.1x manager/vendor to determine the proper configuration for your environment if you want to PXE over 802.1x. Also, carefully consider the security risks associated with allowing PXE over 802.1x outside of dedicated imaging location.
In order to get the Task Sequence wizard to load in WinPE on an 802.1x protected network, you will need to get authenticated to your network. This post will show you how to auto inject your 802.1x authentication script and files into your WinPE image each time you add or update boot image in ConfigMgr. While you can use this to add ANY files to you boot image, I’m just showing how to do it for 802.1x (I’ll add some links to the Resources post at the end of the series). Also, these steps are for an x64 boot image. You would do the same for x86, just use the x86 versions of everything listed.
Here’s what you need
All of the files you created in Part 1
OSDInjection.XML - The master file manifest used by SCCM to inject files into all of your boot images that you import into SCCM.
winpeshl.ini - A configuration file that tells WinPE what to launch on startup (Think Autoexec.bat)
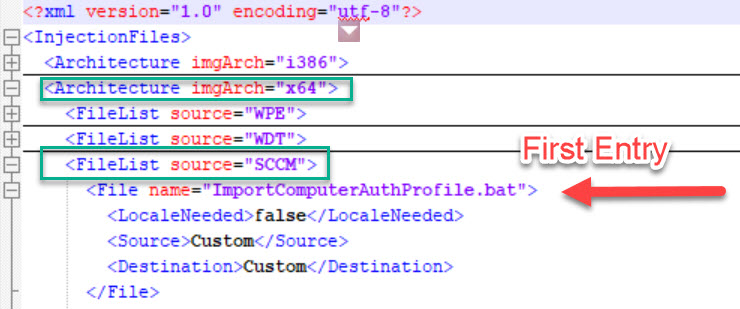
OSDInjection.XML
You can find your OSDInjection.XML on your ConfigMgr primary server under [SCCM Install directory]\bin\x64\OSDInjection.XML. This file is a manifest that SCCM uses to inject specific files into your boot image. There are several sections in the XML, so be sure to make your entries in the correct location.
Create a new folder named Custom under [SCCM Install directory]\OSD. Add your 802.1x script, profile XML, and certificates to this new folder. Add new lines to your OSDInjection.XML file that correspond to each of your new files. Each entry should include the source folder Custom and a destination folder on the OS. The destination paths are based on the root drive that PE is working from (generally X:).
| |
Winpeshl.ini
You won’t find a winpeshl.ini file on your server (unless you’ve done this before) and will need to create one. This file is referenced by WinPE as it is starting up and tells PE what to launch. If we add our 802.1x authentication script to this file, we can force authentication to happen before any other process, even your boot image Pre-Start commands (we never could get them to work for 802.1x pre-auth, but they may be an option here - not sure honestly). Here’s the contents of mine.
The bat file listed should be the name of your 802.1x authentication script. The last step tells PE to launch the Task Sequence wizard. If you didn’t create this file, you could watch the SMSProv.log on your primary and see when this file is created dynamically during your boot image import process.
Save the winpeshl.ini file to [SCCM Install directory]\OSD\bin\x64\winpeshl.ini. You will notice that the file isn’t included in the OSDInjection.xml file. That’s because SCCM uses the injection file first, then creates or imports (if it exists in the correct folder) the winpeshl.ini file afterwards, so whatever you copied with the injection process gets overwritten. (Ask me how I know that one!)
The big finish!
At this point, you should have the following files in the following locations
[SCCM Install directory]\Bin\x64\OSDInjection.XML
[SCCM Install directory]\OSD\Custom\ImportComputerAuthProfile.bat
[SCCM Install directory]\OSD\Custom\ComputerAuthProfile.xml
[SCCM Install directory]\OSD\Custom\Certs\Root.cer
[SCCM Install directory]\OSD\Custom\Certs\ComputerAuthCert.pfx
[SCCM Install directory]\OSD\bin\x64\Winpeshl.ini
Next, import a new boot image in your ConfigMgr console and wait a bit. You can watch SMSProv.log (if you have a busy site, good luck, it scrolls and rolls fast!) and see the injection happening. It will log if any files weren’t found. You can also just mount your boot image to check to see if your files ended up where you specified in the Destination field in OSDInjection.XML. In our case, you should have a new root folder named Custom with everything in it (except winplshl.ini which will be in c:\Windows\System32).
Now boot a machine into WinPE and check it out. If you did it right, you should see your script run and get authenticated through 802.1x. You can check the winpeshl.log in WinPE to see what it ran if you are having issues.
An alternative approach to this would be to customize the WinPE WIM on your primary, but you would still have to have the custom winplshl.ini file to launch your custom script. Also, every time you update your ADK, you will have to service the WinPE WIM. This method will ensure that it gets updated every time. You can even update the script after you’ve imported the boot image, then just Update Distribution Points for your boot image and it SCCM will re-inject the files without you having to open the WIM up with DISM.
Part 3 will cover Bare Metal Task Sequence configuration